
KMS ver. 1.2.401 – MapleStory NEXT: Destiny Weapon & Star Force Reorganization!

The fourth and final patch of the MapleStory NEXT update has been released, featuring the new Destiny Weapon system as well as a big update to the Star Force system (mainly being able to reach 30 stars)! Everything basically came as-is from the test server, except for a bit of changes to the values of the Adversary’s Resolve drops from bosses for the Destiny Weapon missions.
Next month is MapleStory’s 22nd anniversary, the live server patch will be on April 17 and the test server patch will probably be on April 10. It’s also going to be the first patch with brand new content that wasn’t covered by the NEXT showcase.
MapleStory NEXT Roadmaps
Content Roadmap:
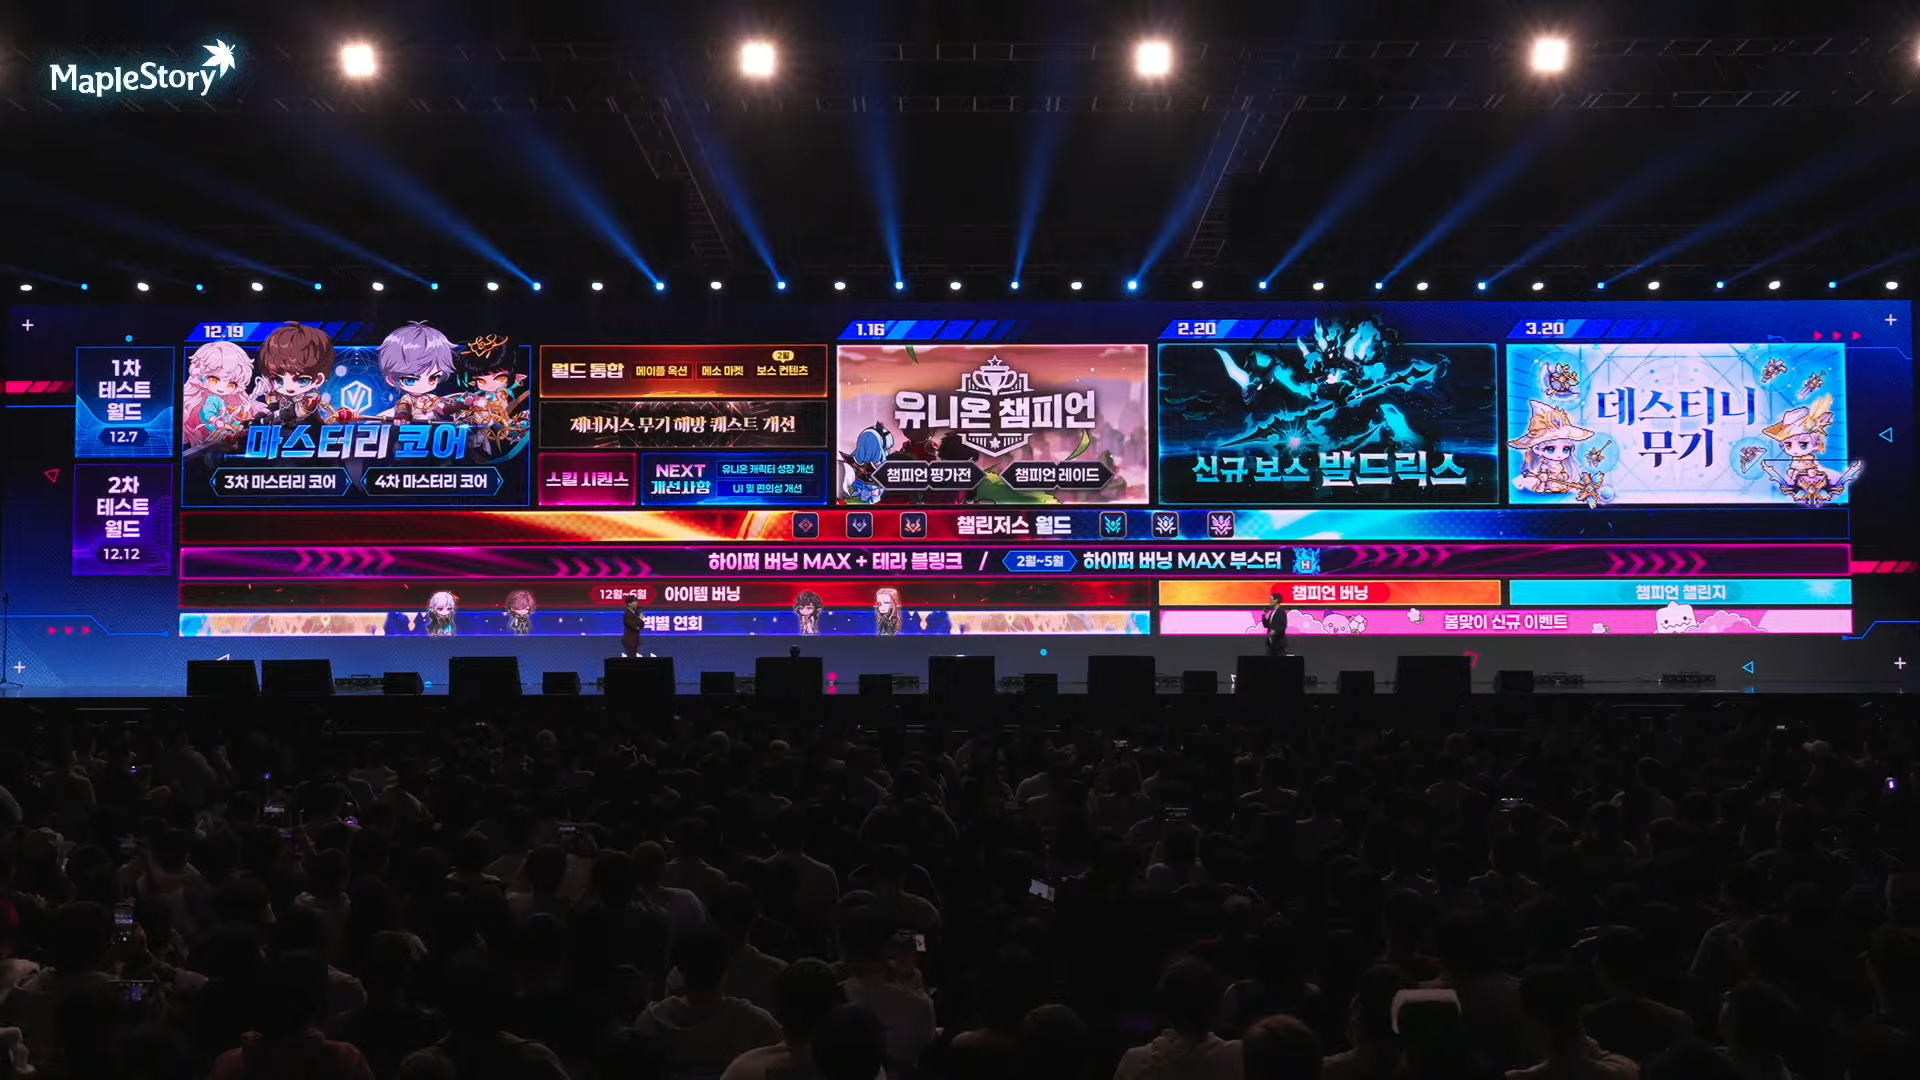
- December 19:
- Mastery Cores
- Cross World Maple Auction and Meso Market
- Genesis Weapon Liberation quest improvements
- Skill Sequence
- NEXT Improvements (Union character growth improvements, UI and convenience improvements)
- January 16:
- Union Champion (Champion Missions and Champion Raid)
- February 20:
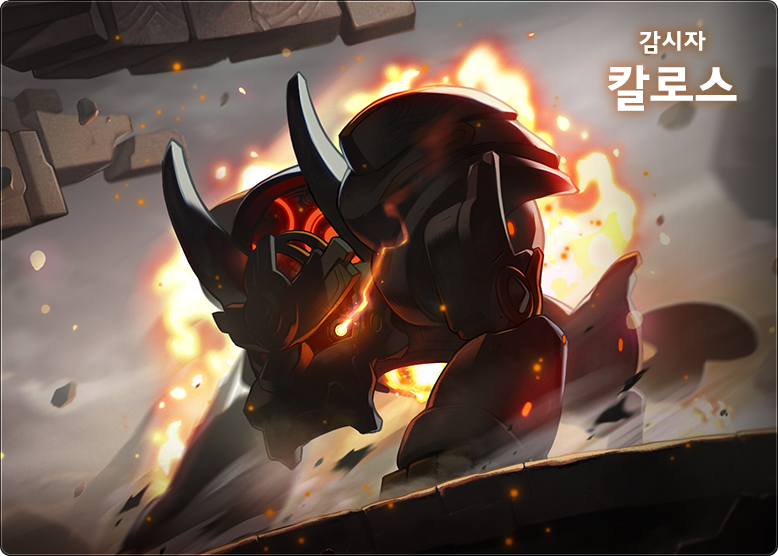
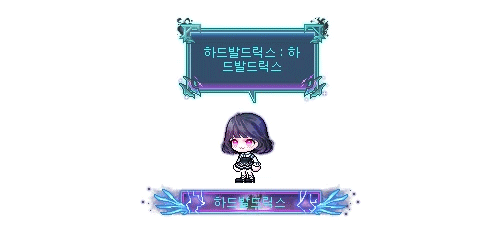
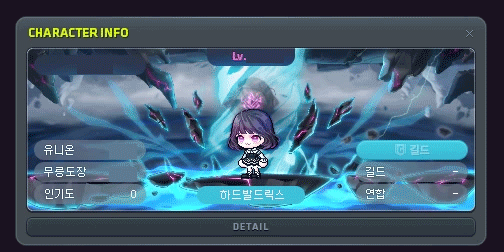
- New Boss Baldrix
- March 20:
- Destiny Weapon
Event Roadmap:
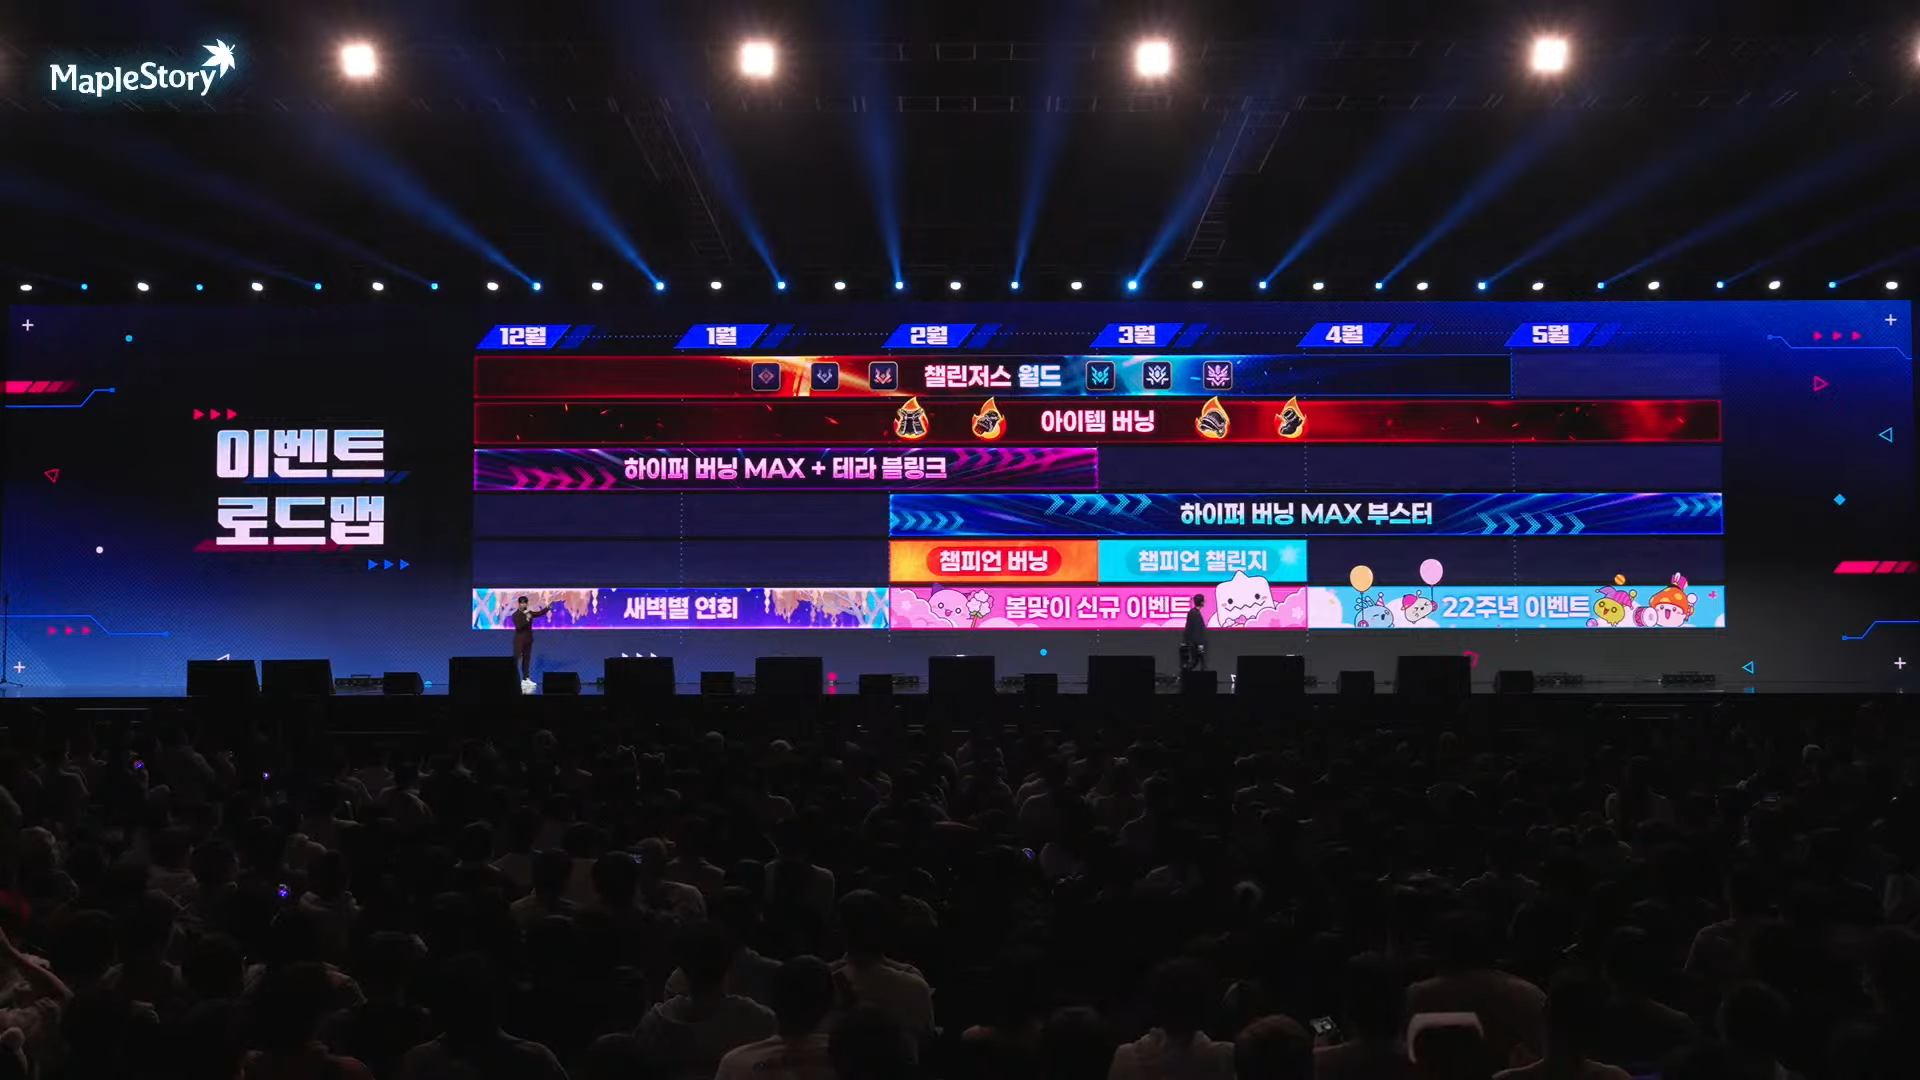
- December: Challengers World, Item Burning, Hyper Burning MAX + Tera Blink, Dawn Star Banquet
- February: Hyper Burning MAX Booster, Champion Burning/Champion Challenge, New Spring Event
- April: 22nd Anniversary Event
Overview
- Star Force Reorganization
- Maximum Meso Limit Expansion
- Destiny Weapon
- HEXA Stat
- Boss Monster Reward Improvements
- Special Skill Rings
- Boss Pattern Improvements
- Grandis World Map Changes
- Mac Version Beta Service
- Cash
- Open API
- Improvements
- Error Fixes
- Events
Star Force Reorganization
The maximum Star Force limit on level 138 and higher equipment has been increased to 30 stars.
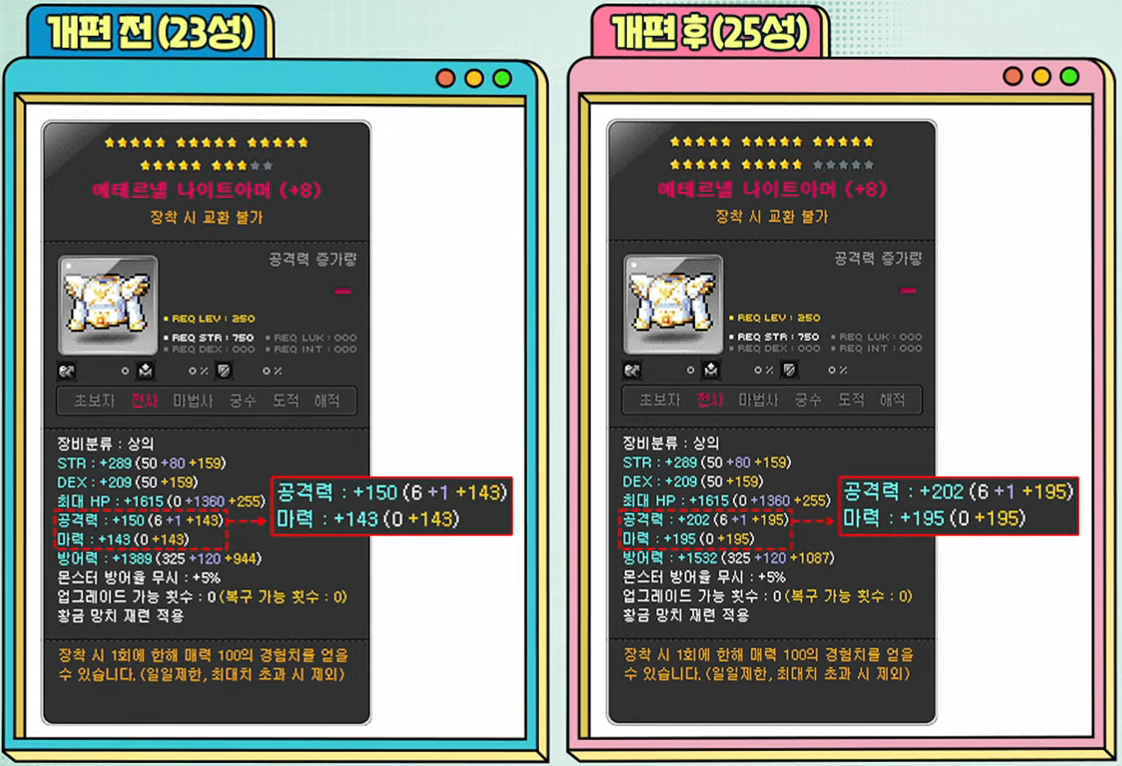
Existing 23 star and higher equipments’ Star Force number of stars and stats will be adjusted.
| Existing Stars | Adjusted Stars |
|---|---|
| 23 Stars | 25 Stars |
| 24 Stars | 28 Stars |
| 25 Stars | 30 Stars |
※ However, items in Eos/Helios worlds with the Binding Mark applied as well as Eos/Helios worlds’ Great Sword/Long Sword items will not be adjusted.
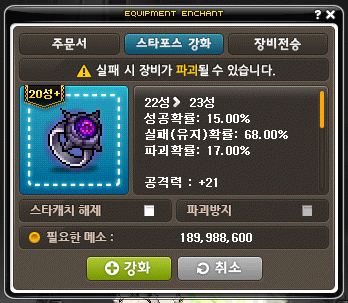
When you fail a Star Force enhancement at 15 stars or higher, the number of stars will no longer decrease. The success rate and destruction rate will be adjusted as follows.
| Number of Stars | Success Rate | Failure (Maintain) Rate | Destruction Rate |
|---|---|---|---|
| 15 Stars | 30.00% | 67.90% | 2.10% |
| 16 Stars | 30.00% | 67.90% | 2.10% |
| 17 Stars | 15.00% | 78.20% | 6.80% |
| 18 Stars | 15.00% | 78.20% | 6.80% |
| 19 Stars | 15.00% | 76.50% | 8.50% |
| 20 Stars | 30.00% | 59.50% | 10.50% |
| 21 Stars | 15.00% | 72.25% | 12.75% |
| 22 Stars | 15.00% | 68.00% | 17.00% |
| 23 Stars | 10.00% | 72.00% | 18.00% |
| 24 Stars | 10.00% | 72.00% | 18.00% |
| 25 Stars | 10.00% | 72.00% | 18.00% |
| 26 Stars | 7.00% | 74.40% | 18.60% |
| 27 Stars | 5.00% | 76.00% | 19.00% |
| 28 Stars | 3.00% | 77.60% | 19.40% |
| 29 Stars | 1.00% | 79.20% | 19.80% |
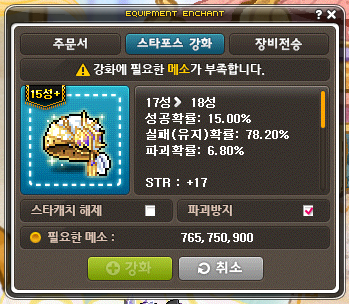
The meso cost when enhancing items at 17~19 stars and starting from 21 stars has been increased.
The safeguard cost when enhancing has been increased from 100% of the base meso cost to 200%.
You can now safeguard items when Star Forcing 17 star equipment.
A Star Force enhancement related Sunday Maple effect has been added.
- When Star Force enhancing items at 21 stars or lower, the destruction rate is decreased by 30%.
New Star Force related achievements have been added.
- [Star Force] 26 Stars!
- [Star Force] 27 Stars!
- [Star Force] 28 Stars!
- [Star Force] 29 Stars!
- [Star Force] 30 Stars!
![]() Demon Avenger’s Conversion Star Force’s maximum Star Force applied will be limited to 410 stars.
Demon Avenger’s Conversion Star Force’s maximum Star Force applied will be limited to 410 stars.
Maximum Meso Limit Expansion
The maximum meso limit has been expanded from 499,999,999,999 mesos (500b) to 1,999,999,999,999 (2T) mesos.
Destiny Weapon


The elders of Shangri-La have discovered another possibility within the Genesis Weapon. Will the Adversary be able to surpass the power left behind by the Black Mage on their own?
- Participation Requirements:
- Characters that have completed the ‘[Genesis Weapon] Liberation of Power, Part 2’ quest, have the Genesis Weapon, and have completed the ‘[Shangri-La] Light Through the Shadows’ quest.
※ Characters that have not completed the ‘[Shangri-La] Light Through the Shadows’ can watch the Story Summary or instantly complete them without having to do the pre-requisite quests through the Story Skip feature.
Destiny Weapon related quests have been added.
- [Destiny Weapon] Call of Shangri-La
- [Destiny Weapon] The Transcendent’s Weapon
- [Destiny Weapon] Decisive Battle, Chosen Seren
- [Destiny Weapon] Decisive Battle, Watcher Kalos
- [Destiny Weapon] Decisive Battle, Apostle Kaling
- [Destiny Weapon] The Adversary’s Weapon
- [Destiny Weapon] The Adversary’s Resolve
※ You can open the Destiny Transcendance Mission UI through the ‘[Destiny Weapon] The Adversary’s Resolve’.
Decisive Battle Quests
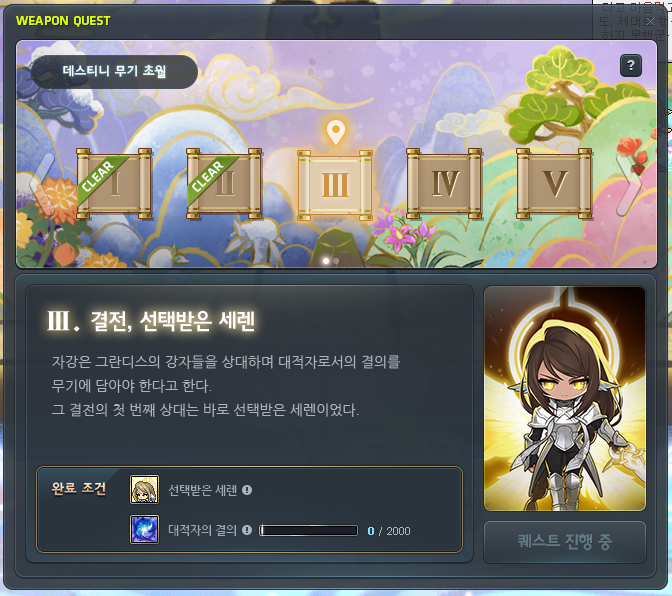
The Decisive Battle quests can be completed by clearing boss monsters in Destiny Mode alone with specific conditions, and collecting the required amount of Adversary’s Resolve for each quest.
※ You cannot participate in the Decisive Battle quests in Cross World Boss Content.
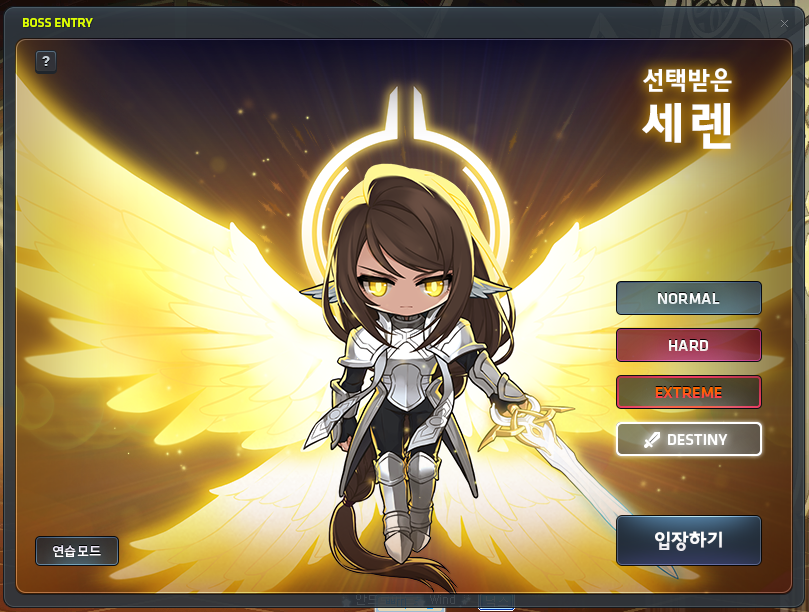
The information for each Decisive Battle quests are as follows.
| Decisive Battle Quest | Destiny Mode | Required Adversary’s Resolve |
|---|---|---|
| Decisive Battle, Chosen Seren | Defeat Hard Seren with an 80% final damage reduction. | 2,000 |
| Decisive Battle, Watcher Kalos | Defeat Chaos Kalos with your Death Count reduced to 3. | 2,500 |
| Decisive Battle, Apostle Kaling | Defeat Hard Kaling with a 20% final damage boost | 3,000 |
You can acquire Adversary’s Resolve by defeating Grandis boss monsters of a certain difficulty and higher.
| Boss | Adversary’s Resolve |
|---|---|
| Hard Seren | 6 |
| Normal Kalos | 10 |
| Normal Kaling | 20 |
| Chaos Kalos | 70 |
| Extreme Seren | 80 |
| Normal Limbo | 120 |
| Normal Baldrix | 150 |
| Hard Kaling | 160 |
| Hard Limbo | 360 |
| Extreme Kalos | 400 |
| Hard Baldrix | 450 |
| Extreme Kaling | 1,200 |
※ When you defeat a boss, the amount of Adversary’s Resolve acquired will be divided equally based on the number of players who entered the boss.
※ You can accumulate up to a maximum of 3,000 Adversary’s Resolve. Any Adversary’s Resolve exceeding the required amount for the current Decisive Battle quest can be used in the following Decisive Battle quest.
If you have records of defeating any boss monsters that give Adversary’s Resolve from March 20, 2025 at 12:00 AM until the March 20 maientance, you can talk to the Maple Admin NPC to receive the Adversary’s Resolve for the Decisive Battle quest.
※ The Adversary’s Resolve compensation payment through the Maple Admin NPC is available from March 20, 2025 after the update until March 26 at 11:59 PM.
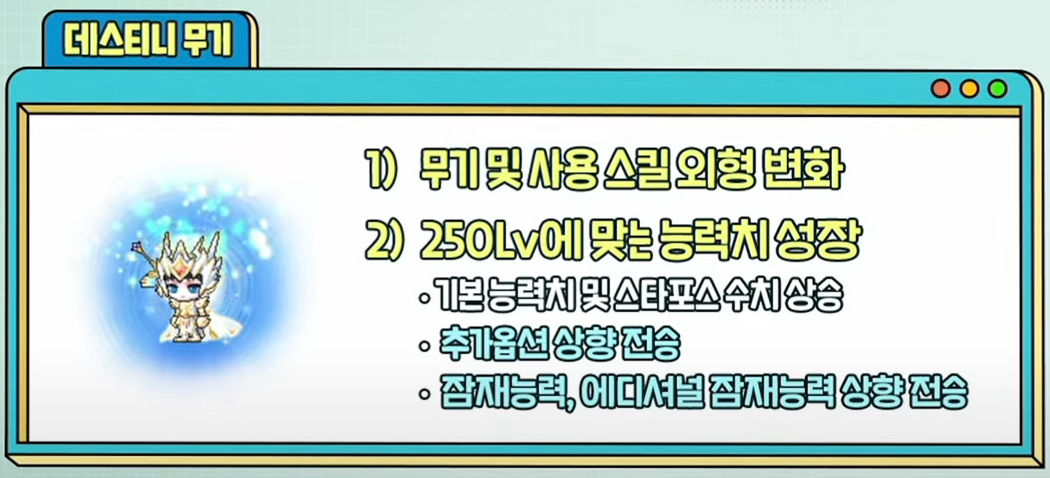
After completing all of the Decisive Battle quests, you can transcend the Genesis Weapon into the Destiny Weapon through the ‘[Destiny Weapon] The Adversary’s Weapon’ quest.
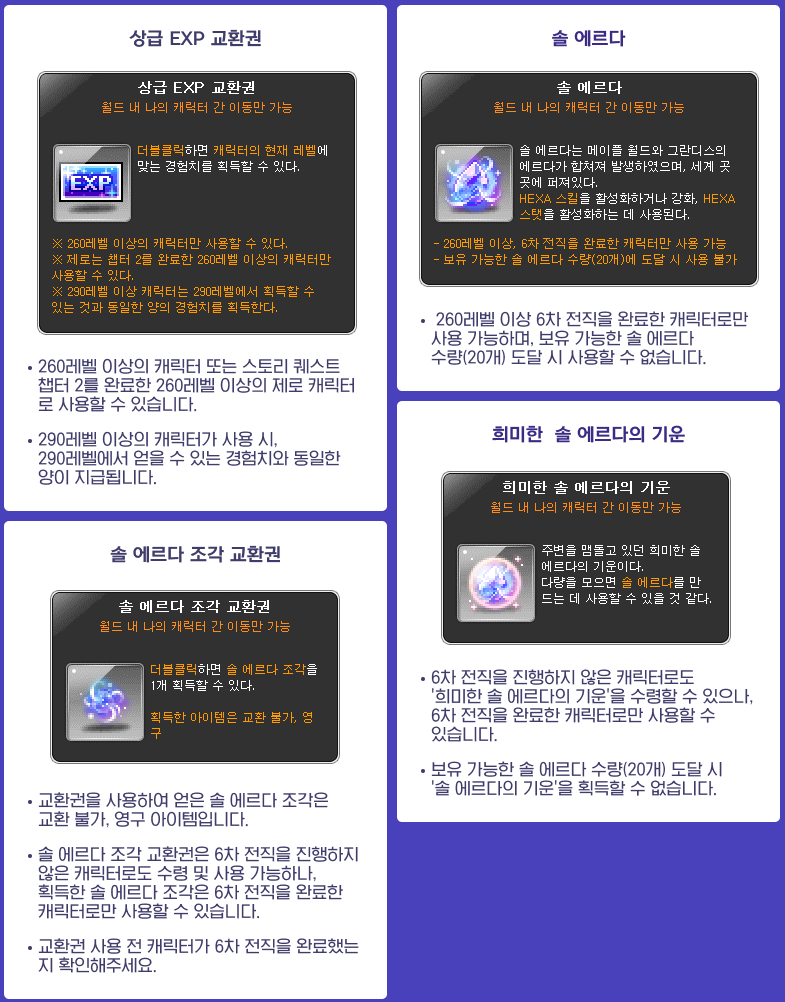
- The Destiny Weapon is granted by upgrading the stats of the Genesis Weapon that you have based on the following.
- The equipment level is increased to level 250. The base stats are increased based on the new level.
- All of the upgrade slots are consumed with 15% Spell Trace enhancements based on each job.
- Star Force 22 star enhancement.
- The existing Genesis Weapon’s potential values are upgraded to match the level 250 item.
- The existing Genesis Weapon’s additional potential values are upgraded to match the level 250 item.
- The existing Genesis Weapon’s additional option values are upgraded to match the level 250 item.
- The existing Genesis Weapon’s Soul Weapon is transferred.
- You cannot perform any additional Star Force or scroll enhancements.
- When you equip a Destiny Weapon, you can use the following 2 skills. (They’re reskins of the existing Genesis Weapon skills, no number changes.)
 Transcendence: Unbreakable Resolve
 Transcendence: Decisive Battle’s Will
- For Zero characters, you can acquire a Destiny Essence that lets you enhance Lapis/Lazuli into Destiny Lapis/Lazuli.
- You can only hold 1 Destiny Weapon on a character, and it cannot be traded.
- If you lose your Genesis Weapon while completing these quests, you must complete the Genesis Weapon quests again from the beginning.
- If you lose your Destiny Weapon after completing these quests, you must complete the Genesis Weapon quests again from the beginning then complete the Destiny Weapon quests again.
Destiny Weapon related achievements have been added.
- [Destiny Weapon] Decisive Battle, Chosen Seren
- [Destiny Weapon] Decisive Battle, Watcher Kalos
- [Destiny Weapon] Decisive Battle, Apostle Kaling
HEXA Stat
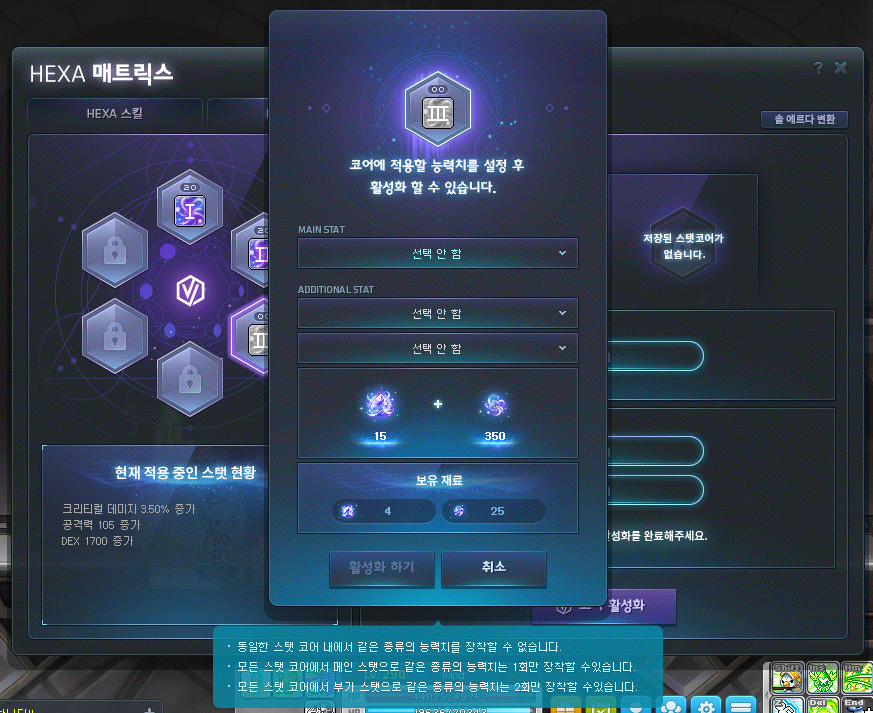
The Stat Core III can now be activated.
- Only characters level 270 or higher that have a level 20 Stat Core II can activate Stat Core III.
- Stat Core III requires 15 Sol Erda and 350 Sol Erda Fragments to activate.
- Stat Core III requires 35m mesos to reset its enhancement information.
Boss Monster Reward Improvements
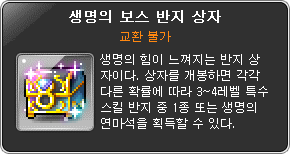

New boss monster rewards have been added.
- Boss Ring Box of Life
- When you use this item, you can acquire a Level 3~4 Special Skill Ring or a Grindstone of Life based on set rates. (You can see the rates on the official site here.)
- This item can be acquired from the following boss monsters.
- Watcher Kalos (Chaos/Extreme)
- Kaling (Hard/Extreme)
- Limbo (Normal/Hard)
- Baldrix (Normal/Hard)
- Grindstone of Faith
- This item can be used to upgrade Level 5 Special Skill Rings to Level 6.
- This item can be acquired from the following boss monsters.
- Limbo (Normal/Hard)
- Baldrix (Normal/Hard)
※ The items’ drop rates are different based on the boss monster.
※ Item drop rate increasing effects will be applied.
※ The Boss Ring Box of Life cannot be traded. The items acquired by using the Boss Ring of Life can be traded.
※ The Grindstone of Faith can be traded.
The following boss monsters will no longer drop the White Jade Boss Ring Box.
- Watcher Kalos (Chaos/Extreme)
- Kaling (Hard/Extreme)
- Limbo (Normal/Hard)
- Baldrix (Normal/Hard)
The following boss monsters will no longer drop the Grindstone of Life.
- Watcher Kalos (Easy)
- Kaling (Easy)
The Green Jade/Red Jade/Black Jade/White Jade Boss Ring Boxes’ item names will no longer include the rank.
Special Skill Rings
A new item that lets you acquire Special Skill Rings has been added.
- Boss Ring Box of Life
A new Grindstone has been added.
- By using the Grindstone of Faith and mesos, you can polish certain types of Level 5 Special Skill Rings to level 6 with a set rate.
- You can set the number of Grindstones to use when attempting to polish. The polishing success rate and mesos consumed are set based on the number of Grindstones.
| Number of Grindstones | Success Rate | Mesos Used |
|---|---|---|
| 1 | 5% | 1,000,000,000 mesos |
| 2 | 10% | 2,000,000,000 mesos |
| 3 | 15% | 4,000,000,000 mesos |
| 4 | 20% | 7,000,000,000 mesos |
| 5 | 25% | 10,000,000,000 mesos |
The following items have been changed to be able to be polished.
- Restraint Ring Level 5
- Continuous Ring Level 5
- Risktaker Ring Level 5
- Weapon Puff – S Ring Level 5
- Weapon Puff – D Ring Level 5
- Weapon Puff – I Ring Level 5
- Weapon Puff – L Ring Level 5
- Ring of Sum Level 5
- Crit Damage Ring Level 5
Certain Special Skill Rings’ maximum level limits have been increased to 6. The level 6 effects are as follows.
| Special Skill Ring | Level 6 Effects |
|---|---|
| Restraint Ring | Consumes 200 HP, create an area for 20 seconds that increases your own attack/magic attack by 120% while inside it, 180 second cooldown. |
| Continuous Ring | When the Continuous Ring is equipped, prepare for 120 seconds. When you finish preparing, when an attacking skill hits a boss monster, increases boss damage by 195% and attack/magic attack by 14% for 8 seconds, 12 second reactiation cooldown. |
| Risktaker Ring | Consumes 600 HP, increases attack/magic attack by 60% for 40 seconds. However, if you are hit, the buff is cancelled, 180 second cooldown. |
| Weapon Puff – S Ring | Consumes 600 HP, increases STR equal to 480% of your equipped primary weapon’s attack. For Demon Avenger, increases HP by 17.5x that value (applied as the higher value between the primary weapon’s attack and magic attack), 180 second cooldown. |
| Weapon Puff – D Ring | Consumes 600 HP, increases DEX equal to 480% of your equipped primary weapon’s attack (applied as the higher value between the primary weapon’s attack and magic attack), 180 second cooldown. |
| Weapon Puff – I Ring | Consumes 600 HP, increases INT equal to 480% of your equipped primary weapon’s attack (applied as the higher value between the primary weapon’s attack and magic attack), 180 second cooldown. |
| Weapon Puff – L Ring | Consumes 600 HP, increases LUK equal to 480% of your equipped primary weapon’s attack (applied as the higher value between the primary weapon’s attack and magic attack), 180 second cooldown. |
| Ring of Sum | Consumes 600 HP, increases main stat equal to 2.4% of all stats added together for 20 seconds. For Demon Avenger, increases HP by 17.5x that value, 180 second cooldown. |
| Crit Damage Ring | Consumes 600 HP, increases critical damage by 35% for 20 seconds, 180 second cooldown. |
The following item has been added.
- Grindstone of Faith

It has been improved so that when you leave the Restraint Ring’s area, it will no longer disappear. However, the attack/magic attack boost effect will only be applied while inside the area.
Boss Pattern Improvements
Suu

- In Phase 2, the Upper Bombardment pattern’s cooldown has been increased. (This is the red bombardment attack that targets your location then hits the ground after a short time.)
- In Phase 2, the Electric Field Install’s cooldown has been increased. (This is the drone that follows you, fixes itself to that location, then continues to attack, and if you are hit multiple times, you are knocked into the air.)
- In Phase 2, the Electric Field Install’s duration has been decreased by about 25%.
- In Phase 2, it has been improved so that you are no longer knocked into the air if you are hit by the Electric Field Install multiple times.
- In Phase 2, the Falling Parts’ part creation interval has been increased by about 15%. (This is the attack where scrap metal falls from the sky, centered on Suu’s location.)
- In Phase 2, the Falling Parts’ stun duration has been decreased by 50%.
- In Phase 3, the number of Upper Bombardment activations has been decreased.
- In Phase 3, the Electric Field Install’s cooldown has been increased.
- In Phase 3, the Electric Field Install’s duration has been decreased by about 25%.
- In Phase 3, it has been improved so that you are no longer knocked into the air if you are hit by the Electric Field Install multiple times.
- In Phase 3, the Suppression Bunker’s forward attack’s delay has been increased by about 40%. (This is the attack where Suu hits in front of him with a giant drill then the bunker extends to hit behind him.)
- In Phase 3, the Suppression Bunker’s forward attack’s lower range has been decreased by about 11%.
- In Phase 3, the Indiscriminate Bombardment’s stun duration has been decreased by about 50%. (This is the attack where multiple red warning areas appear on the map then explode after a couple of seconds and stun you if you are hit.)
- In Extreme Mode Phase 3, the number of Indiscriminate Bombardment activations has been decreased by 1.
- In Extreme Mode Phase 3, the number of Indiscriminate Bombardment locations has been decreased by 2.
- In Phase 3, the Artillery Turret pattern has been removed. (This is the attack where the turrets around Suu light up then shoot in front of him every few seconds, knocking you into the air if you are hit.)
- In Story Mode Phase 3, the Artillery Turret pattern has been removed.
Damien
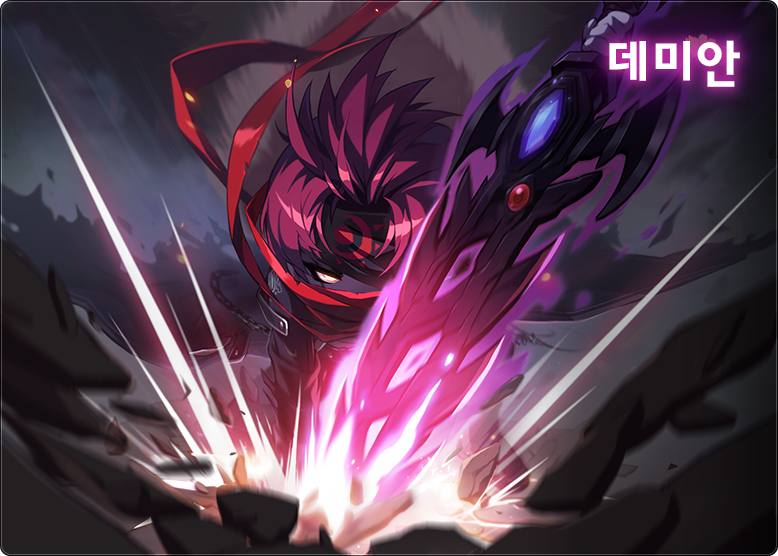
- In Phase 1, the Falling Meteors’ cooldown has been increased.
- In Phase 1, the Falling Meteors’ duration has been decreased.
- In Phase 2, the Falling Meteors’ cooldown has been increased.
- In Phase 2, the Falling Meteors’ duration has been decreased.
- In Phase 2, the Abyss Crystals’ movement speed has been decreased. (These are the blue orbs that spawn and lower your final damage if you stand on top of them.)
- In Phase 2, it has been improved so that while Damien is bound, the Abyss Crystals lose their power and disappear.
- In Phase 2, the maximum number of Abyss Crystals created has been decreased to 2.
- In Phase 2, the maximum number of size increases of the Abyss Crystals has been decreased to 2.
Guardian Angel Slime

- The Slime Laser’s attack range has been decreased by about 35%.
Will

- In Phase 1, the Teleport’s cooldown has been increased.
- In Phase 1, after the Moonlight Shield is created, if all party members stay inside the shield for a certain period of time, the Space Collapse will now activate instantly. (This means in the Phase 1 tests, after the shield is created, you can instantly activate the screen crack and unlock the next segment without having to wait the set amount of time.)
- In Phase 2, the Mirror of Lies pattern’s number of times the Giant Spider Leg pattern activates has been decreased from 5 to 3. (This is the Phase 2 test pattern, so it will only go through 3 rounds of spider legs instead of 5.)
Jin Hilla
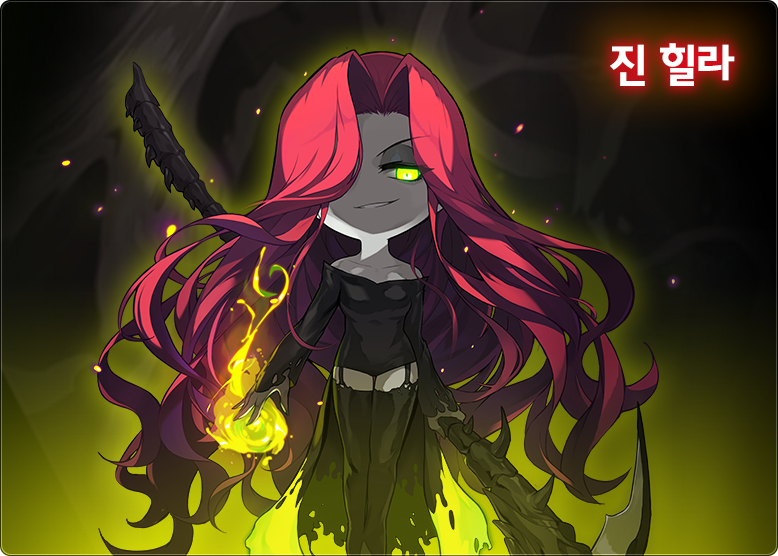
- The Bone Wave patterns’ attack hitbox durations have been decreased. (These are the green/purple attacks, reducing their lingering hitboxes.)
Black Mage
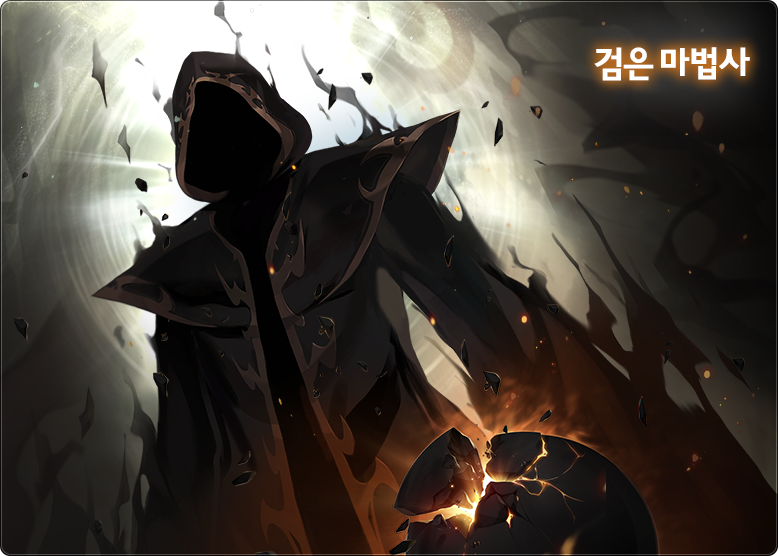
- In Phase 3, it has been improved so that the Authority of Creation and Absorption patterns can no longer be used at the same time. (This is the ‘down FMA’ attack, so Black Mage can no longer suck you in after casting it.)
Chosen Seren

- In Extreme Mode, the amount of Sun gauge increased when you are hit by the Light of Judgement pattern has been decreased by about 50%. (This is the attack where Seren creates radial lasers in multiple directions around herself.)
- The Stab pattern’s attack range has been decreased by about 22%. (This is the attack where Seren stabs her sword in front of her.)
- In Phase 1, it has been improved so that the Sun’s Rage can no longer activate stacked on top of each other at the same location. (These are the pillars that shoot up from the ground.)
- In Phase 2, it has been improved so that Midnight’s maximum angle is no longer decreased based on Chosen Seren’s remaining HP. (This is the mechanic where at the end of every Midnight phase, the Midnight time is decreased and the Sunset time is increased based on Seren’s HP. It is not the ‘anticheat’ mechanic that instantly ends Midnight if you deal too much damage.)
- In Phase 2, whenever the time of day changes, it has been changed so that the Midnight angle is increased proportionally based on the number of party members that were not affected by the Sun’s Curse. (This is the mechanic where every phase change, if no party members died or gauged during the entire time of day, the Midnight angle would be increased. It now only considers if any party members gauged or not.)
- In Phase 2 Sunset, it has been improved so that the Blazing Sword can no longer activate stacked on top of each other at the same location. (These are the pillars.)
- In Phase 2 Dawn, the Nerota’s Rising attack has been changed so that it no longer knocks you back when hit and instead applies a slow status effect. (This is the attack where Seren summons a deer that moves along the ground and explodes into a pillar every few seconds.)
- In Phase 2 Dawn, the stun duration when hit by the Radiant Swords has been decreased by about 50%. (These are the swords that appear from the top of the map then fall to the ground after a short period of time.)
- In Phase 2 Dawn, the Radiant Swords’ effect has been changed.
- In Phase 2 Dawn, the Sun gauge increase when hit by the Nerota’s Incarnation has been decreased by about 25%. (These are the deer she summons.)
- In Phase 2 Dawn, the Sun gauge increase when hit by the Radiant Swords has been decreased by about 25%.
- In Phase 2 Dawn, the Sun gauge increase when hit by the Nerota’s Power has been decreased by about 33%. (These are the orbs she summons that pop after someone goes near them.)
Watcher Kalos
- Fixed an issue in Phase 2 where the Watcher’s Servants looked awkward when bound.
- In Phase 2, the Watcher’s Fury’s number of activations has been decreased from 5 to 3. (This is the test where you must avoid Kalos’ FMA by standing in the golden shield.)
- In Chaos Mode Phase 2, the Eye of Restraint and Eye of Abyss’ activation intervals have been increased by about 13%. (These are the left and right structures respectively.)
- In Chaos Mode Phase 2, the Enhanced Eye of Restraint and Enhanced Eye of Abyss’ activation intervals have been increased by about 15%. (These are the left and right structures respectively when 3 or more structures are active at the same time.)
- In Extreme Mode Phase 2, the Eye of Restraint and Eye of Abyss’ activation intervals have been increased by about 8%.
- In Extreme Mode Phase 2, the Enhanced Eye of Restraint and Enhanced Eye of Abyss’ activation intervals have been increased by about 10%.
- In Extreme Mode Phase 2, the Eye of Restraint’s number of shots fired has been adjusted.
- In Chaos and Extreme Mode Phase 1 and 2, the limited vision range when hit by the Eye of Abyss and Enhanced Eye of Abyss has been decreased.
Kaling

- In Phase 1, Taowu’s Electric Discharge’s number of hits has been decreased from 10 to 1. (This is the one-shot attack where Taowu fires electricity in a straight line. It was changed from 100%x10 to 100%x1.)
- In Phase 1’s Spring of Lost Vitality, the 2nd floor platform height has been changed. (This is Qiongqi’s map.)
- In Phase 3, statues have been added that you can activate to make your attacks prioritize hitting the Death Gripped Perils.
- In Hard Mode Phase 1, the gauge increase when hit by the flower strings has been decreased by about 22%.
- In Hard Mode Phase 2, the gauge increase when hit by the Slaughtering Wing pattern has been decreased by about 6%. (This is the attack where Kaling slams in front of her with her wing.)
- In Hard Mode Phase 2, the gauge increase when hit by the Thunderbolt of Conviction pattern has been decreased by about 6%. (This is the attack where Kaling slams her spear into the ground.)
- In Hard Mode Phase 2, the gauge increase when hit by the Thorns of Death pattern has been decreased by about 6%. (This is the attack where Kaling creates thorns around her with a dark cloud.)
- In Hard Mode Phase 3, the gauge increase when hit by the Wind Release pattern has been decreased by about 6%. (This is the tornado attack in the Qiongqi section.)
- In Hard Mode Phase 3, the gauge increase when hit by the Judgement pattern has been decreased by about 6%. (This is the lightning attack in the Taowu section.)
- In Hard Mode Phase 3, the gauge increase when hit by the Tracking Bullet pattern has been decreased by about 6%. (This is the chain attack in the Hundun section.)
- In Hard Mode Phase 3, the gauge increase when hit by the flower strings has been decreased by about 18%.
- In Extreme Mode Phase 1, the gauge increase when hit by the flower strings has been decreased by about 23%.
- In Extreme Mode Phase 1, the gauge increase when hit by the Lightning Shot pattern has been decreased by about 10%. (This is the attack where Taowu shoots three bolts of lightning in front of him.)
- In Extreme Mode Phase 2, the gauge increase when hit by the Slaughtering Wings pattern has been decreased by about 5%.
- In Extreme Mode Phase 2, the gauge increase when hit by the Thunderbolt of Conviction pattern has been decreased by about 5%.
- In Extreme Mode Phase 2, the gauge increase when hit by the Thorns of Death pattern has been decreased by about 5%.
- In Extreme Mode Phase 3, the gauge increase when hit by the Wind Release pattern has been decreased by about 10%.
- In Extreme Mode Phase 3, the gauge increase when hit by the Judgement pattern has been decreased by about 10%.
- In Extreme Mode Phase 3, the gauge increase when hit by the Tracking Bullet pattern has been decreased by about 10%.
- In Extreme Mode Phase 3, the gauge increase when hit by the flower strings has been decreased by about 15%.
Baldrix

- In Phase 1’s Hostility Stained Sanctuary, the 2nd floor platform height has been changed. (This is the Ancient God’s Thoughts map.)
Grandis World Map Changes


The Grandis World Map has been changed.
The following maps have been added to the Grandis area.
- Erimos Dock
- Ristonia Dock
- Savage Terminal Hub
Certain maps in the Grandis area have been changed.
- Marketplace
- Sun-Drenched Plateau
The following Grandis area NPCs have been removed.
- Shalala
- Trubion
- Deva
- Sosori
The following Grandis area NPCs have been added.
- Seya
- Becle
- Hazlel
Mac Version Beta Service
- Fixed an issue where patching did not continue after the Error Code 32 occured while patching.
- Fixed an issue where directional keys were not recognized during direction mode or minigames.
- Fixed an issue where Korean characters and number input were not entered and certain keys like the Tab key did not work when using full-screen mode in Hangul entry mode.
Cash

The 7th Luna Petite: Petite Snow set will be available.
- Kai, Adelei, Petite Snow
Open API
The feature to search for HEXA Stat III has been added to the Character Info search’s HEXA Matrix setting HEXA Stat information search.
It has been improved so that you can now search for each Union Champion character’s nickname in the Union information search’s Union Champion information search.
Fixed an issue where items’ icons were searched with shadows in the Character Info search.
Fixed an issue where if a character equipped a two-handed weapon and a Cash weapon, the weapon would not be displayed properly in certain motions of the character’s appearance in the Character information search’s basic information.
Fixed an issue where if a character equipped a specific category of weapon such as bows, crossbows, or dual bowguns, the character’s appearance would not be displayed with one-handed weapon motions in the Character information search’s basic information.
A guide message has been added about the item and stats’ duration search results in the Character Info and Union Info searches.
You can now check if a destruction rate reduction event was applied in the Star Force information search.
※ The Open API update details will be applied after the MapleStory Open API service maintenance (3/20).
Improvements
Skills
Improved an issue where Demon Avenger’s Exceed stage was not maintained if they died and revived in a different location while in the final Exceed stage.
Quests


The following quests have been added to the Tallahart area.
- [Tallahart] Baldrix’s Traces
- [Tallahart] The Magic Power’s Identity
- [Tallahart] Crystal Ball of Illusions
- [Tallahart] Record of Illusions 1
- [Tallahart] Record Restoration
- [Tallahart] Record of Illusions 2
- [Tallahart] It’s a Pity Like This
- [Tallahart] Unidentified Voice
- [Tallahart] Illusion Acclimatization
- [Tallahart] Ally or Enemy
- [Tallahart] The Traitor, Praga
- [Tallahart] The Voice’s Identity
- [Tallahart] A New Enemy?
- [Tallahart] Capture the Remnants
- [Tallahart] Secret of the Knights
- [Tallahart] Resolution
- [Tallahart] Priest’s Concerns
- [Tallahart] Zeke’s Chest
- [Tallahart] Priest’s Pendant
- [Tallahart] The Chest’s Identity 1
- [Tallahart] The Chest’s Identity 2
- [Tallahart] Illusion’s Legacy
You can now enter the Union Raid through the Lightbulb icon while the ‘[Maple Union] PC Room Weekly Dragon Hunting’ quest is active.
Fixed an issue where after completing the Challengers World hunting mission, the Receive button would activate after a delay in certain situations.
Items


To prevent the issue where using a Guild’s Blessing item while affected with the Guild’s Greater Blessing effect would consume the item without applying the effect, characters that currently have the Guild’s Greater Blessing effect will not be able to use Guild’s Blessing.
The Guild’s Greater Blessing and Guild’s Blessing icons have been improved so they are visually distinguishable.
It has been improved so that even if the Party Pick-Up Rights are set to ‘Party Leader’, items required for clearing certain content can be acquired by all party members.
NPCs
A guide message for features that cannot be used has been added to the dialogue when entering the Cross World Boss Content <Dimensional Battlefield> map.
The following NPCs have been added to the Tallahart area.
- Ao
- Tirnog
Monsters
Kaling
- In Hard Mode Phase 1, Qiongqi’s HP has been decreased by about 24.5%.
- In Hard Mode Phase 1, Hundun’s HP has been decreased by about 24.5%.
- In Hard Mode Phase 1, Taowu’s HP has been decreased by about 24.5%.
- In Hard Mode Phase 2, Kaling’s HP has been decreased by about 24.5%.
- In Hard Mode Phase 3, Death-Gripped Qiongqi’s HP has been decreased by about 24.5%.
- In Hard Mode Phase 3, Death-Gripped Hundun’s HP has been decreased by about 24.5%.
- In Hard Mode Phase 3, Death-Gripped Taowu’s HP has been decreased by about 24.5%.
- In Hard Mode Phase 3, Frenzied Kaling’s HP has been decreased by about 24.5%.
- In Extreme Mode Phase 1, Qiongqi’s HP has been decreased by about 17.5%.
- In Extreme Mode Phase 1, Hundun’s HP has been decreased by about 17.5%.
- In Extreme Mode Phase 1, Taowu’s HP has been decreased by about 17.5%.
- In Extreme Mode Phase 2, Kaling’s HP has been decreased by about 17.5%.
- In Extreme Mode Phase 3, Death-Gripped Qiongqi’s HP has been decreased by about 17.5%.
- In Extreme Mode Phase 3, Death-Gripped Hundun’s HP has been decreased by about 17.5%.
- In Extreme Mode Phase 3, Death-Gripped Taowu’s HP has been decreased by about 17.5%.
- In Extreme Mode Phase 3, Frenzied Kaling’s HP has been decreased by about 17.5%.
In Baldrix (Normal/Hard), Champion Insignias and Champion’s Protection effects will now be applied.
Maps
Cross World Boss Content has been improved so that you can now use the Hyper Stat reset, preset change, and Noblesse Guild skill re-use features using mesos.
Cross World Boss Content has been improved so that you can use the Character Change feature.
Cross World Boss Content has been improved so that you can use all skills in the <Dimensional Battlefield> map.
If you have less than 50 Boss Reward slots remaining, you can no longer enter the Cross World Boss Content <Dimensional Battlefield> map.
Fixed an issue where Lie Detectors would activate in the ‘Tangyoon’s Boiling Pot’ map.
When you approach elements that can be interacted with in the <Sunset Octopus Beach>, a guide will now be displayed. You can interact by pressing the Sit key when the blue mark is displayed.
UI
The ‘Shield’ category has been added to the Maple Auction’s Cash Item search menu.
The Equipment Enhancement UI’s Star Force Enhancement tab has been improved so that it displays probabilities up to the second decimal place.
Improved an issue where the client slowed down for a short period of time when accepting quests and starting navigation.
The Character Change UI has been improved so that you can change characters by double clicking.
It has been improved so that the emoticon tooltip displayed in the chat window or chat input window will also display the emoticon name.
When adjusting the chat window width, if there is a Chat Tab or Add Chat Tab button in an area wider than the chat window width, the buttons will now be hidden.
Fixed an issue where you could not feed the Golden Octopus if certain keys were set as the NPC Chat/Harvest key.
Fixed an issue where the Golden Octopus UI displayed the results in advance.
Events
The ‘Spiegella’s Golden Tomato Punch King Entry Ticket’ item’s tooltip has been improved.
The ‘Enter the Golden Tomato Punch King’ Event List’s icon has been improved.
The ‘Enter the Golden Tomato Punch King’ Event List’s guide has been improved.
Error Fixes
Skills
Common
- Fixed an issue where certain skills were sometimes not created properly on platforms.
Hero
- Fixed an issue where Furious Edge’s stack buff icon sometimes was displayed incorrectly.
Paladin
- Fixed an issue where if cooldown reduction effects were applied to Falling Justice, sometimes the reactivation cooldown was not applied properly.
- Fixed an issue where if Page Order’s stun debuff was refreshed, the debuff icon was not displayed properly.
Archmage (I/L)
- Fixed an issue where if Freezing Effect was refreshed, the debuff icon was not displayed properly.
Bishop
- Fixed an issue where if you used Holy Symbol then exited specific maps, an incorrect guide message would be displayed.
Bowmaster
- Fixed an issue where if Extra Quiver Cartridge satisfied the automatic usage requirements, the guide message would be displayed continuously on specific maps.
Pathfinder
- Fixed an issue where if Curse Transition was refreshed, the debuff icon was not displayed properly.
Dual Blade
- Fixed an issue where Dark Sight was cancelled by All Must Die.
Viper
- Fixed an issue where Liberate Neptunus sometimes did not apply the absolute bind on enemies.
Cannon Shooter
- Fixed an issue where if Decent Holy Fountain was installed, using Pool Maker would sometimes not drop supply boxes.
Night Walker
- Fixed an issue where if Element: Darkness was refreshed, the debuff icon was not displayed properly.
Aran
- Fixed an issue where Adrenaline Boost’s Ice Wave was cancelled when using certain content.
Eunwol
- Fixed an issue where Spirit Claw VI and Bomb Punch VI could not be used while using Blade Imp.
Demon Slayer
- If use a Giant Potion or Advanced Giant Potion during Demon Awakening then attack, the automatically activating Cerberus will no longer be activated.
- Fixed an issue where Nightmare sometimes did not apply the absolute bind to enemies.
Demon Avenger
- Fixed an issue where sometimes the Exceed stage was not maintained if you died and revived in the same location while in the final Exceed stage.
Wild Hunter
- Fixed an issue where if Another Bite was refreshed, the debuff icon was not displayed properly.
Xenon
- Fixed an issue where Aegis System’s targeting effect was displayed to other characters regardless of the skill effect transparency option.
Kaiser
- Fixed an issue where Regain Strength did not apply the final damage boost effect when attacking monsters inflicted with certain status effects.
Cadena
- Fixed an issue where Chain Arts: Chase did not hit certain monsters.
Illium
- Fixed an issue where Crystal Gate would sometimes be installed in a location where it was already installed.
Zero
- Fixed an issue where certain skills case by Assist would sometimes appear awkwardly to other users. The changed skills are as follows.
- Power Stomp
- Advanced Power Stomp
- Rolling Curve
- Rolling Assaulter
- Power Stomp VI
- Rolling Curve VI
- Rolling Assaulter VI
Quests
Fixed an issue where if you accepted the Dual Blade 3rd job advancement quest through the Maple Guide, you would be moved to Lady Syl’s Room.
Fixed an issue where if you tried to proceed with the ‘[Cross Hunter] Entering the Past’ without completing the quest, the message displayed would be awkward.
Items
Fixed an issue where if you used Karma Black Cubes on an equipped item, the cursor icon would be displayed as a Craftsman’s Cube.
Fixed an issue where if you relogged into a character, sometimes experience related buff effects would disappear.
If you try to equip multiple types of Boost Rings at the same time, a pop-up notification has been added that states you can only equip 1.
Fixed an issue in the Maple Auction’s Previous Auction Item Claim tab where certain items could not be received.
Fixed an issue where the Lv. 300’s Blessing effect could stack with the Lv. 250’s Blessing Effect or the Lv. 275’s Blessing effect. If you try to stack these buff effects, only the most recently used buff effect will be applied to the character.
Fixed an issue where the Lv. 300’s Blessing could stack with Boss Practice Mode and Fog Forest Training Centre’s Lv. 250/Lv.275’s Blessing effects.
Fixed an issue with Zero characters where equipping or unequipping Cash items or unequipping or moving Cash items between Alpha and Beta in the Cash equipment window, it would behave awkwardly in certain situations.
Monsters
Fixed an issue in Damien where the Abyss Crystals sometimes appeared awkwardly.
Fixed an issue where Guardian Angel Slime sometimes did not appear.
Fixed an issue where Jin Hilla sometimes did not appear.
Fixed an issue in Black Mage (Extreme) Phase 4 where sometimes it would not be considered a clear even when the Black Mage was defeated.
Fixed an issue in Kalos Phase 2 where if you applied a bind while Kalos was in Groggy, certain monster sound effects would continue to play.
Maps
Fixed an issue in Cross World Boss Content where other characters’ guild marks were not displayed.
Fixed an issue in Cross World Boss Content where the Beauty Room features could be used in certain boss entry maps.
Fixed an issue in Cross World Boss Content’s <Dimensional Battlefield> map where minor accounts could not select Channel 2 with the mouse.
Fixed an issue during the Champion Raid where the stage would restart intermittently.
Fixed an issue in Epic Dungeon High Mountain Stage 8 where specific ropes could not be used.
UI
Fixed an issue where if you trid to chance characters in the Cross World Boss Contents <Dimensional Battlefield> map, the connected character was not focused on.
Fixed an issue with the HEXA Matrix where sometimes inactive Cores looked like they were activated.
Fixed an issue with the HEXA Matrix’s HEXA Stat tab where certain buttons’ click areas were narrower than the button images.
Fixed an issue with Link Skill Presets where deleted characters’ Link Skills remained.
Fixed an issue with the Maple Auction’s Completed tab where the sort by descending did not work.
Fixed an issue where the Quest Helper UI sometimes moved abnormally.
Fixed an issue where if you used the Shortcut Key Settings UI’s import feature, it would display a guide message saying the Combination Key was not registered even if it was.
Fixed an issue where the Emoticon tooltip was sometimes displayed multiple times.
After the update, if you remove all of the chat window’s chat tabs other than All and Etc then reconnect, that status will now be maintained.
Fixed an issue where if you clicked the right side of the external chat window’s internal chat window button, the resolution would change.
Fixed an issue where the chat input window was visible in certain cutscene modes.
Fixed an issue where if you Star Force enhanced an item that you used an Innocent Scroll on, sometimes the item tooltip would display the enhancement stats and Star Force stats awkwardly.
Fixed an issue in the Character Info UI where Demon Avenger’s Conversion Star Force’s increased HP was classified as a personality trait.
Events
Fixed an issue where if Zero, Illium, Cadena, and Ark characters that did not clear specific story quests used Double Up EXP Points, the points would be consumed but experience would not be provided.
Fixed an issue where the ‘Can level up’ text appeared rarely even though you could not level up using the Double Up EXP Points.
Events
MapleStory Spring Season Event [On Stranger Tides]

[Hunting Event] Challenge! Great King Golden Octopus

Grow the Golden Octopuses that bring various treasures into Great King Golden Octopuses and receive special rewards!
Event Participation Requirements:
- A level 101 or higher character (or a Zero character that has completed story quest Chapter 2) that has participated in the ‘[Attendance Check] Carcion Octo Festival’ event.
Event Period:
- March 20, 2025 after the maintenance ~ April 16, 2025 at 11:59 PM.

You can select the ‘[Hunting Event] Challenge! Great King Golden Octopus’ event in the Event List and click the ‘Participate’ button or talk to Calico in <Sunset Octopus Beach> to start the ‘[Hunting Event] Challenge! Great King Golden Octopus’ quest.
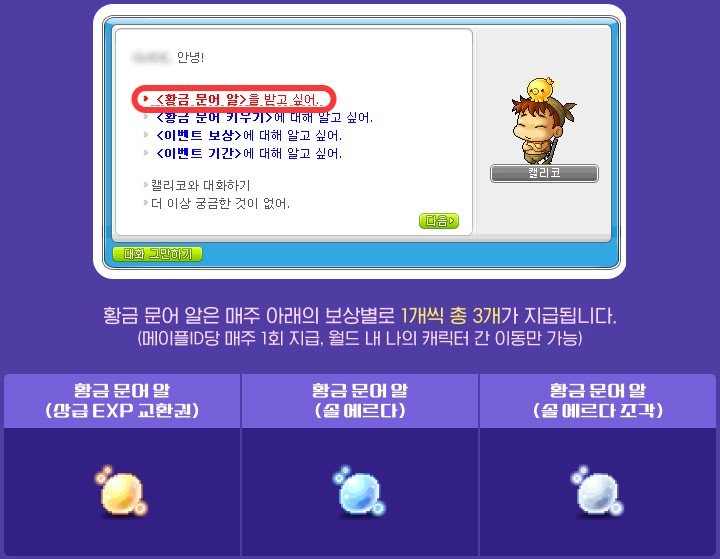
After starting the quest, you will acquire 3 types of Golden Octopus Eggs, once per week per Maple ID.
- Golden Octopus Egg (Advanced EXP Vouchers)
- Golden Octopus Egg (Sol Erda)
- Golden Octopus Egg (Sol Erda Fragments)
※ The Golden Octopus Egg receipt records are reset every Thursday at 12:00 AM. Any Golden Octopus Eggs that you received in the previous week that you did not use will disappear.
※ You cannot receive Golden Octopus Eggs from 11:59 PM on Wednesdays to 12:00 AM on Thursdays.
※ Golden Octopus Eggs acquired can only be put into storage.
Feeding Golden Octopuses
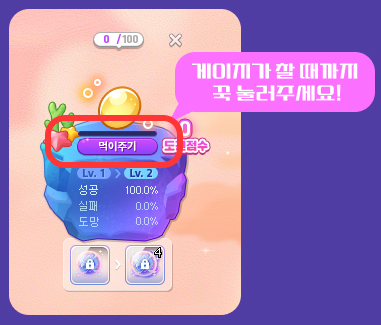

You can register a Golden Octopus Egg in the Raising Golden Octopuses UI by using it from your inventory.
After registering it and defeating 1,000 monsters within your level range, you can hold down the [Feed] button with your mouse on the UI or press the NPC Chat/Harvest key on the pop-up UI until the gauge fills up to feed the Golden Octopus. The following [Feeds] can be done every time you defeat 300 monsters within your level range.
※ Only one Golden Octopus Egg can be registered at a time per character.
※ You can [Feed] each Golden Octopus up to 100 times.
※ The number of monsters within your level range defeated is not shared between characters.
※ Monsters within your level range are monsters that are between -20 and +20 of your character’s level.
※ The event will only progress if you defeat monsters within your level range while you are in a party of 1 or are not in a party.
※ Even if you don’t feed the octopus while the [Feed] pop-up UI appears, you can still feed it later on by pressing the [Feed] button on the Golden Octopus UI.
A Golden Octopus can grow up to level 6. When you [Feed] one, its level can increase, decrease, or the Golden Octopus can escape, based on a set probability. The higher level a Golden Octopus, the more rewards you can acquire.
If the Golden Octopus escapes, you can no longer [Feed] it or acquire its rewards.

Once you have claimed the rewards from a Golden Octopus, you can no longer [Feed] it, and you will able to register another Golden Octopus.
The growth status of the Golden Octopus registered in the UI will not disappear even if it passes 12:00 AM on Thursday.
| Golden Octopus Level | Success | Fail | Escape |
|---|---|---|---|
| Level 1 | 100% | 0% | 0% |
| Level 2 | 40% | 60% | 0% |
| Level 3 | 20% | 79.5% | 0.5% |
| Level 4 | 10% | 87% | 3% |
| Level 5 | 5% | 90% | 5% |
※ At level 2, even if you fail the [Feed], the level will not decrease.
※ The Golden Octopus has a set rate to level up 2 times. That rate is included in the success rate.
Challenge Points
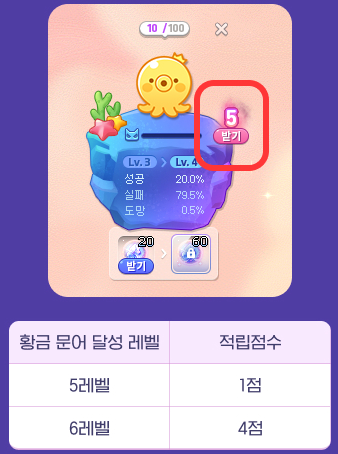
When your Golden Octopus reaches level 5 or higher, you can acquire Challenge Points. You will receive Challenge Points per Golden Octopus based on the level it reaches.
- If it reaches level 5, receive 1 point.
- If it reaches level 6, receive 4 points (total of 5 points).
※ Even if the Golden Octopus’ level goes down or it runs away, you will maintain your Challenge Points.
※ The Challenge Points acquired are shared between all characters within the Maple ID.
You can acquire the following rewards based on your cumulative Challenge Points.
| Cumulative Challenge Points | Reward | Quantity | Tradability |
|---|---|---|---|
| 4 Points | Golden Octopus Hat Voucher | 1 | Can only be put into storage. |
| 9 Points | Karma Black Cube | 10 | |
| 12 Points | Karma White Additional Cube | 10 | |
| 15 Points | Golden Octopus’ Heart Medal Voucher | 1 | |
| Karma Black Cube | 10 | ||
| Karma White Additional Cube | 10 |

※ All reward items can be received until April 16, 2025 at 11:59 PM. They will expire on April 17, 2025 at 2:00 AM.
※ The cumulative Challenge Point rewards can only be claimed 1 time per Maple ID.
Event Rewards
| Golden Octopus Level | Advanced EXP Vouchers | Sol Erda/Faint Sol Erda Energy | Sol Erda Fragment Vouchers |
|---|---|---|---|
| Level 2 | 20 | 4 Faint Sol Erda Energy | 1 |
| Level 3 | 100 | 20 Faint Sol Erda Energy | 5 |
| Level 4 | 300 | 60 Faint Sol Erda Energy | 15 |
| Level 5 | 800 | 160 Faint Sol Erda Energy | 40 |
| Level 6 | 6,000 | 12 Sol Erda | 300 |
※ The acquired rewards can only be put into storage.
※ The Advanced EXP Vouchers can only be used by level 260 or higher characters (Zero characters must finish Story Quest Chapter 2).
※ The Sol Erda can only by used by characters level 260 or higher that have completed the 6th job advancement. It cannot be used if you hold 20 Sol Erda.
※ The Sol Erda Fragment Vouchers can only by used by characters level 260 or higher that have completed the 6th job advancement. The Sol Erda Fragments acquired are untradable and permanent.
※ All reward items can be received until April 16, 2025 at 11:59 PM. They will expire on April 17, 2025 at 2:00 AM.
[Champion Burning] Champion Challenge

Champion Challenge is back with more challenging missions! Clear various missions with 3 characters within the world, get Challenge Coins and Perfect Challenge Coins, and trade them for various items!
Event Participation Requirements:
- A level 101 or higher character (or a Zero character that has completed story quest Chapter 2).
Event Period:
- March 20, 2025 after the maintenance ~ April 16, 2025 at 11:59 PM.
※ The Champion Challenge event cannot be started before the March 20, 2025 maintenance. You can check the Help text through the Event List to see the related explanation.

You can select the ‘[Champion Burning] Champion Challenge’ event in the Event List and click the ‘Participate’ button to start the Champion Challenge event.
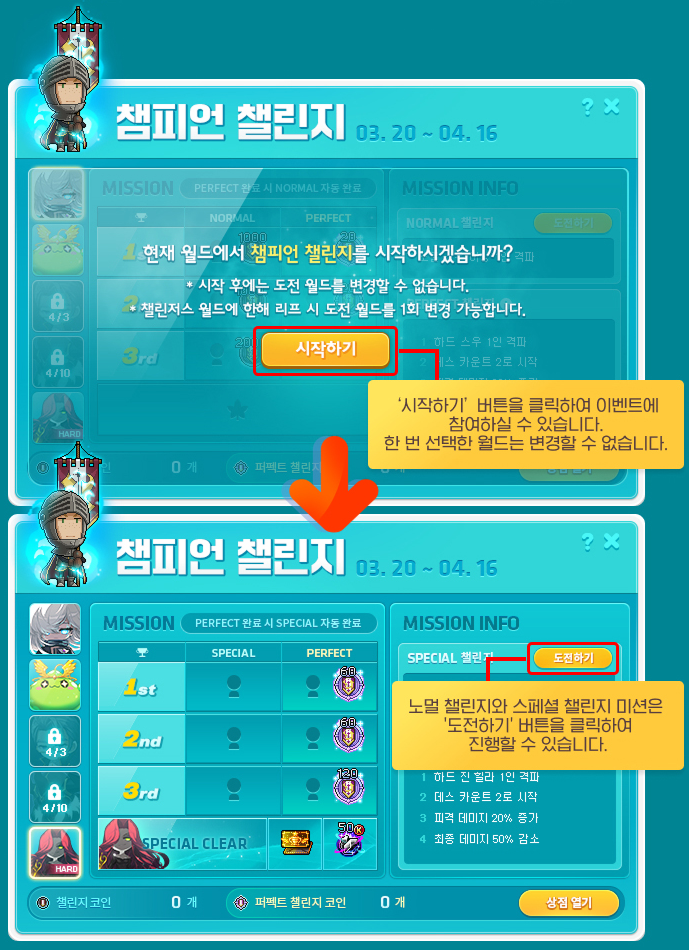
When you first start the event, you can select the world you want to proceed with the Champion Challenge by pressing the Start button.
※ You cannot change the world after selecting it, so please choose carefully.
If you start the Champion Challenge event in Challengers World, you can change the selected world 1 time.
※ If you World Leap, you can change the world by pressing the ‘[Champion Burning] Champion Challenge’ button in the Event List with the character that World Leaped in the destination world.
※ If you change the selected world, the mission progress information and number of Challenge Coins/Perfect Challenge Coins you have will be moved to the changed world.
※ If you change the selected world, you can no longer complete the Champion Challenge in Challengers World, and you can no longer use the Challenge Coin Shop.
Each Champion Challenge mission can only be completed 1 time within the selected world. Every week, a new mission will be opened up. Each weekly mission can be completed by up to 3 different characters.
The missions are divided into the Normal Challenges, Perfect Challenges, and Special Challenges.
If you perform a mission without starting the Champion Challenge, it will not be recognized as being completed, so please make sure to press the ‘Start’ button before doing the mission.
※ Even if you have not started the Champion Challenge, the ‘Normal Challenge Defeat Suu’ mission and the ‘Special Challenge Defeat Jin Hilla’ mission can be completed.
※ Even if you have not started the Champion Challenge, if you defeated Suu or Hard Jin Hilla on Normal Mode or higher before the March 20 maintenance, you can clear the missions after the maintenance.
※ ‘Defeat Boss’ missions can be completed in Practice Mode, and the missions are recognized as completed when the boss monster is defeated in the last phase of each boss.
※ After a Weekly Mission is unlocked, even if you defeat the boss without pressing the Challenge button, you can still clear it afterwards by pressing the Challenge button.
※ Even if you change the name of a character that cleared a Champion Challenge mission, the UI will display the character name at the time of mission completion.
Normal Challenges and Special Challenges
Every week, a new mission will be opened up. Each weekly mission can be completed by up to 3 different characters. Missions can only be completed within the selected world. You can challenge each mission by pressing the Challenge button.
When you complete a mission, you can receive the corresponding reward for that mission. You cannot complete a single week’s missions multiple times with the same character.
Each weekly mission can be completed with any characters, even those that are not the Leader or Follower characters. Each weekly mission can be completed starting from when it opens until the end of the event period.
Normal and Special Challenges can also be completed in Genesis Mode and Union Champion Mode.
When you complete a Normal Challenge Mission, you can acquire Challenge Coins.
There is a ‘Special Challenge Mission’ that can be participated in at any time during the event period. It can be completed by up to 3 characters within the world. The Special Mission can also be completed by any characters, even those that are not the Leader or Follower characters. If you complete the Special Mission 3 times, you can acquire special rewards.
※ You can also challenge the ‘Perfect Challenge Mission’ with characters that have completed Normal and Special Challenge Missions.
Perfect Challenges
Every week, a new mission will be opened up. Each weekly mission can be completed by up to 3 different characters.
The Perfect Challenge Missions are completed by defeating a boss with specific conditions using 3 characters within the world.
※ When you enter a boss, you can enter the Perfect Challenge Mode by clicking the PERFECT button.
If you complete a Perfect Challenge in Real Mode, it will be recognized as you defeating the weekly boss. That boss’ Hard/Chaos Mode for which you completed the mission with cannot be entered again during that week. (This does not apply to Practice Mode)
When you complete a mission, you can receive the corresponding reward for that mission. You cannot complete a single week’s missions multiple times with the same character.
Each weekly mission can be completed with any characters, even those that are not the Leader or Follower characters. Each weekly mission can be completed starting from when it opens until the end of the event period.
The defeat conditions for each boss are as follows.
- Solo the boss
- Start with 2 Death Count
- 20% increased damage taken
- 50% final damage reduction
When you complete a Perfect Challenge Mission, you can acquire Perfect Challenge Coins.
※ If you succeed in a Perfect Challenge Mission, the Normal Challenge and Special Challenge Missions of the corresponding boss will also be completed.
Champion Challenge Mission Rewards
Champion Challenge rewards can only be received 1 time per Maple ID.
The amount of Challenge Coins and Perfect Challenge Coins held is shared within the world you started the event in. The Challenge Coin Shop purchase records are shared between characters within the Maple ID.
The Challenge Coins and Perfect Challenge Coins can be exchanged for various items by clicking the Challenge Coin [Open Shop] button.
| Type | Mission Details | Mission Open Date | 1st Completion | 2nd Completion | 3rd Completion |
|---|---|---|---|---|---|
| Normal Challenge | Solo Suu (any difficulty). | 3/20 | 1,000 Challenge Coins | 1,000 Challenge Coins | 2,000 Challenge Coins |
| Solo Guardian Angel Slime (any difficulty). | 3/27 | ||||
| Solo Will (any difficulty). | 4/3 | ||||
| Solo Dunkel (any difficulty). | 4/10 | ||||
| Perfect Challenge | Solo Hard Suu. | 3/20 | 20 Perfect Challenge Coins | 20 Perfect Challenge Coins | 40 Perfect Challenge Coins |
| Solo Chaos Guardian Angel Slime. | 3/27 | 30 Perfect Challenge Coins | 30 Perfect Challenge Coins | 60 Perfect Challenge Coins | |
| Solo Hard Will. | 4/3 | 40 Perfect Challenge Coins | 40 Perfect Challenge Coins | 80 Perfect Challenge Coins | |
| Solo Hard Dunkel. | 4/10 | 50 Perfect Challenge Coins | 50 Perfect Challenge Coins | 100 Perfect Challenge Coins | |
| Solo Hard Jin Hilla. | 3/20 | 60 Perfect Challenge Coins | 60 Perfect Challenge Coins | 120 Perfect Challenge Coins | |
| Common Defeat Conditions – Solo the boss – Start with 2 Death Count – 20% increased damage taken – 50% final damage reduction | |||||
| Special Challenge | Solo Hard Jin Hilla. | 3/20 | If you complete this mission all 3 times, you can acquire Special Rewards. – Selective Champion Set Voucher – 50 Karma Abyss Rebirth Flames | ||
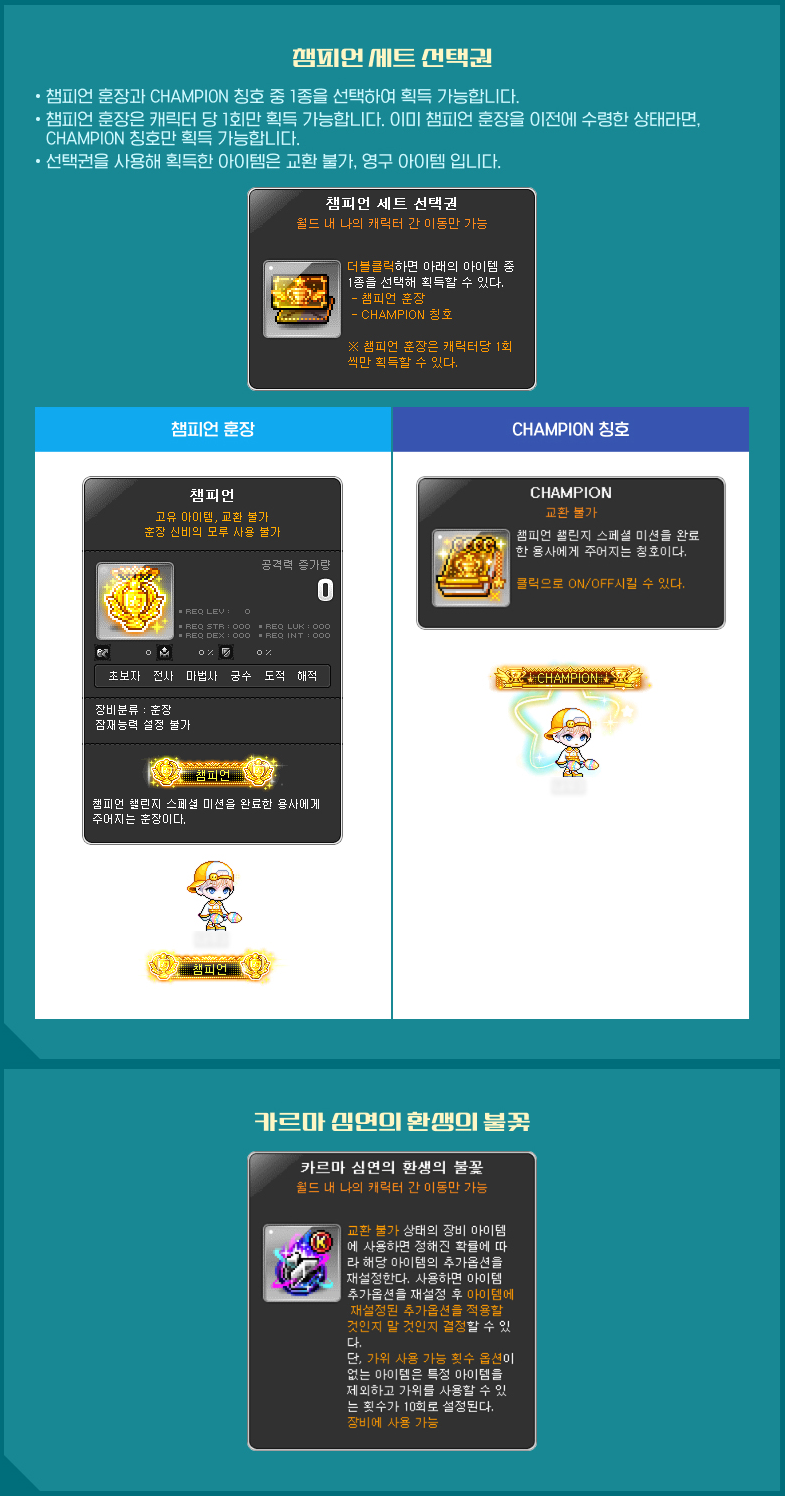
※ The Selective Champion Set Voucher and Karma Abyss Rebirth Flames acquired from the 3 Special Challenges completion rewards will expire on April 17, 2025 at 2:00 AM.
※ When you use the Selective Champion Set Voucher, you can choose between the Champion Medal and the CHAMPION title.
※ The Champion Medal and CHAMPION title acquired from using the Selective Champion Set Voucher are untradable and permanent.
※ The Champion Medal can only be acquired 1 time per character. If you have already received the Champion Medal previously, you can only acquire the CHAMPION title.
Challenge Coin Shop
[Boss Clear] Clash! Battlefield of the Apostle First Clear Rewards
Gifts prepared for the five parties that were first to clear Hard Baldrix! Receive your First Clear Mission Rewards!
Event Participation Requirements:
- Characters that completed the <Clash! Battlefield of the Apostle> event’s First Clear mission.
Event Period:
- March 20, 2025 after the maintenance ~ March 26 at 11:59 PM.
You can select the ‘[Boss Clear] Hard Baldrix First Clear Rewards’ event in the Event List and click the ‘Participate’ button to receive the following rewards.

| Reward | Quantity | Tradability | Duration |
|---|---|---|---|
| ‘From the End Towards Hope’ Title | 1 | Untradable | Permanent |
| Magic Filled Name Tag/Chat Bubble Ring Voucher | 1 | Can only be put into storage | 7 Days |
| Snowfield Coloured by the Midnight Sun Custom Background Voucher | 1 |
※ The First Clear mission rewards can only be claimed 1 time per Nexon ID.
※ The items acquired from using the ‘Magic Filled Name Tag Ring Voucher’, and ‘Magic Filled Chat Bubble Ring Voucher’ are permanent and untradable.
Challengers World 3rd Early Leap
Event Participation Requirements:
- Level 130 or higher characters created in Challengers, Challengers 2, Challengers 3, or Challengers 4 worlds.
※ Zero characters that are level 130 or higher and have completed story quest Chapter 2 can Early Leap.
Event Period:
- March 20, 2025 after the maintenance ~ April 16, 2025 at 11:59 PM.
During the event period, you can leap your characters to your desired world through the NPC Isaga in Henesys. You can select the ‘Challengers World Early Leap’ event in the Event List and click the ‘Participate’ button to move to Henesys.
※ Worlds You can Leap To: All worlds.
※ You can move a total of 5 characters to other worlds through the Challengers World Early Leap and End Leap.
- Challengers Coins in Challengers World will not be moved through World Leap.
- Challengers World Bronze/Silver/Gold rewards that can be acquired from Challengers World Missions can only be claimed in Challengers World.
- The [Event Skill] Special Octopus Dish Buffet’s skill levels will be applied based on the world you arrive in.
※ The number of Chubby and Chewy Octopuses acquired will be maintained. Please level up the skill again in the world you Leap to.
- The [Attendance Check Event] Carcion Octo Festival weekly festival preparations’ number of monsters within your level range defeated record will not be moved.
- Characters with active Meso Market transactions cannot proceed with World Leap.
- When World Leaping from Challengers World, items in the cash storage, storage, and Maple Auction will not be moved.
- Custom Backgrounds acquired using Voucher items will not be moved.
※ Custom Backgrounds acquired using Voucher items can be extracted into Vouchers through the NPC Isaga’s ‘Extract Custom Background’ option. The acquired Voucher can only be put into storage and is permanent.
- The Tera Burning effect applied when a character is created in Challengers World will not be transferred through World Leap.
※ The Tera Burning effect will be removed when the character is transferred, and the ‘Tera Burning Gift Giveaway!’ quest will no longer be available.
- The Strange Cube, Karma Meister Cube, Karma Strange Additional Cube, and Karma Star Force 17 Star Enhancement Scroll (Level 160) purchased from the Challengers Shop are Challengers World-only items and you cannot World Leap while holding them.
- The Selective Challengers Level 4 Special Skill Ring Voucher and the Special Skill Ring acquired from using it are Challengers World-only items and you cannot World Leap while holding them.
- If there are no empty character slots in the world you are moving to, slots will be added before the Leap.
- However, if you already have 49 characters in the destination world, you cannot Leap to that world.
Find the 8000th Day Records

Cassandra speaks to you as MapleStory celebrates its 8000th day. Check out records from MapleStory’s past and receive various rewards!
Event Participation Requirements:
- A level 101 or higher character (or a Zero character that has completed story quest Chapter 2).
Event Period:
- March 20, 2025 after the maintenance ~ March 26, 2025 at 11:59 PM.

You can select the ‘Find the 8000th Day Records’ event in the Event List and click the ‘Participate’ button or talk to Cassanda in main towns to start the event.
You can complete the event by following Cassandra’s hints to find various records of MapleStory’s past to receive the following rewards.
- 8000th Day Party Balloon Riding (Permanent) Voucher
- Together With the 8000th Day Title Voucher
- 8000th Day Damage Skin (Unit)
- 8000th Day’s Maple Fox Voucher
※ You can only participate in the ‘Find the 8000th Day Records’ once per world.
※ The rewards can only be put into storage and will expire in 7 days.

There’s also a hidden mission! After completing all of the other quests, you can go to Jay in Chief Stan’s House in Henesys to receive a Chief Stan’s Hat!
Lady Blair’s Dream Express

Event Period:
- March 21, 2025 at 10:00 AM ~ March 28, 2025 at 10:00 AM.
During this time, you can freely move your Cash items between characters, regardless of cash restrictions.
Sunday Maple

Event Period:
- March 23, 2025
- March 30, 2025
- April 6, 2025
- April 13, 2025
On March 23, the following benefits will take place:
- When Star Force enhancing items at 21 stars or lower, the destruction rate is decreased by 30%.
- 50% discount on Spell Trace enhancement costs
On March 30, the following benefits will take place:
- +250% Monster Park clear experience
- 5x experience from Polo, Fritto, and Especia Bounty Hunting
- 5x experience from Flame Wolf
On April 6, the following benefits will take place:
- 30% discount on Star Force enhancement costs
- [HEXA Stat] When your main stat is level 5 or higher, the main stat enhancement rate is increased by 20%.
On April 13, the following benefits will take place:
- +300% Combo Kill experience
- +100% Rune experience buff effect
- Rune respawn and cooldowns decreased to 10 minutes
- +100% chance to register monsters in Monster Collection
- Receive 3 Mysterious Monster Eggs

Thanks for the translation. I believe there was some additional changes to suu’s electric field installation for both p2 and p3.
Added, thank you!
are the destiny missions doable in party ? its not solo only ?
The actual missions (defeating Hard Seren/Chaos Kalos/Hard Kaling with specific conditions) are solo only.
i wanna bench press baldrix
How much m/att and stat is gained from each star above 25? And was there a change to how much is gained from earlier stars with this change?
Also, if kms still accepts feedback then they should really make destiny weapon requirements duo instead of solo. Some classes like bishops and paladins lose so much of their damage when not in a party. Those classes have their damage balanced around being in a party… I don’t play kms or speak Korean so I can’t even make that feedback.
any mention for superior item with the starforce revamp?