
KMST ver. 1.2.071 – Tenebris Expedition: The Labyrinth of Suffering!

A new KMST patch has been released, containing the second area of Tenebris, the Labyrinth of Suffering! The final Alliance rank has been unlocked and with it, the rest of the Alliance rewards have been revealed. In addition, a new boss, True Hilla, has been added and there were some more changes to the new 5th job skills.
This patch (the Labyrinth, True Hilla, and the new 5th job skills) will be coming to the official servers on July 19!
Tenebris Expedition

The Alliance Rank: Hero has been unlocked. Here are the new special prizes from the Empress. You can only receive these items once per world.
- Hero I
- 50 Alliance Teleport World Scrolls
- 3 Craftsman’s Cubes
- Hero II
- 20 Core Gemstones
- 3 2x Experience Coupons (15 minutes)
- Hero III
- 20 Selective Arcane Symbols
- 3 2x Experience Coupons (15 minutes)
- Hero IV
- Hero Medal of Honour
- Tenebris Expedition Ring Enhancement Scroll (100% success rate, +10 all stats, +5 attack/magic attack, +1000 HP/MP)
- Alliance Meso Support Box II
- Alliance Maple Points Support Box
Alliance Skills

The Alliance Skills’ Legend tab has been activated. The skills that can be learned are as follows.
Legend I
 Alliance’s Basics II: [Ability Skill] Increase all of your stats by 10/20/30/40 and maximum HP by 500/1,000/1,500/2,000. (max level: 4)
 Jean’s Trust: [Content Skill] Acquire 3 additional Arcane Symbol: Morass after completing the Morass daily quests. (max level: 1)
 Mining/Herb Collecting Expert: [Content Skill] When harvesting herbs or ores, increase your item drop rate by 35%. (max level: 1)
 Alliance’s Origin Enhancement III: [Content Skill] Increases Alliance’s Origin’s Desire acquisition rate by 1. (max level: 1)
 Boss Monster Expert: Commanders I: [Content Skill] Increase your item drop rate by 35% when defeating Easy Magnus/Normal Magnus/Hard Magnus/Normal Hilla/Hard Hilla/Easy Arkarium/Normal Arkarium/Easy Von Leon/Normal Von Leon/Hard Von Leon. (max level: 1)
 Monster Ecology Expert I: [Content Skill] Increase your Monster Collection registration rate for regular and Star Force monsters by 35%. (max level: 1)
Legend II
 Alliance’s Strength: Attack/Magic Attack: [Ability Skill] Increase your attack/magic attack by 10/20/30. (max level: 3)
 Crafting Expert: [Content Skill] When crafting equipment/accessories/alchemy items, reduce the crafting cooltime by 40%. [required skill: level 1 Mining/Herb Collecting Expert] (max level: 1)
 Urus Expert: [Content Skill] When participating in Urus content, increase the chance of getting special materials by 40%. (max level: 1)
 Warena’s Trust: Commanders I: [Content Skill] Acquire 50% additional Mileage after completing the “Eliminate Easy Magnus/Normal Magnus/Hard Magnus/Normal Hilla/Hard Hilla/Easy Arkarium/Normal Arkarium/Easy Von Leon/Normal Von Leon/Hard Von Leon” quests. [required skill: level 1 Boss Monster Expert: Commanders I] (max level: 1)
 Ollie’s Trust: [Content Skill] Acquire 3 additional Arcane Symbol: Esfera after completing the Esfera daily quests. [required skill: level 1 Jean’s Trust] (max level: 1)
- Monster Ecology Expert II: [Content Skill] Increase your Monster Collection registration rate for Elite Monsters by 40%. [required skill: level 1 Monster Ecology Expert I] (max level: 1)
Legend III
 Profession Master: [Content Skill] Increase the hourly fatigue restoration rate by 10. [required skill: level 1 Crafting Expert] (max level: 1)
 Collector’s Trust: Commanders I: [Content Skill] Increase the selling price of your Powerful Strength Crystals from Easy Magnus/Normal Magnus/Hard Magnus/Normal Hilla/Hard Hilla/Easy Arkarium/Normal Arkarium/Easy Von Leon/Normal Von Leon/Hard Von Leon by 50%. [required skill: level 1 Warena’s Trust: Commanders I] (max level: 1)
 Boss Monster Expert: Commanders II: [Content Skill] Increase your item drop rate by 45% when defeating Normal Will/Hard Will/Normal Lucid/Hard Lucid/Normal Demian/Hard Demian/Normal Suu/Hard Suu. (max level: 1)
- Monster Ecology Expert III: [Content Skill] Increase your Monster Collection registration rate for boss monsters by 45%. [required skill: level 1 Monster Ecology Expert II] (max level: 1)
 Monster Park Expert: [Content Skill] Increase the Monster Park completion experience by 45%. (max level: 1)
 The SEED Expert: [Content Skill] Acquire an additional 45% Seed Points after clearing the SEED. (max level: 1)
Legend IV
 Mashoor’s Trust: [Content Skill] When participating in Urus content, increase the amount of mesos received by 45%. [required skill: level 1 Urus Expert] (max level: 1)
 Monster Expedition Expert: [Content Skill] Acquire 1 additional reward when a Monster Collection expedition is completed. [required skill: level 1 Monster Ecology Expert III] (max level: 1)
 Alliance’s Strength: Defense Ignore: [Ability Skill] Increase your defense ignore by 30%. (max level: 1)
 Spiegelmann’s Trust: [Content Skill] Acquire 1 additional Day Box after completing Monster Park. [required skill: level 1 Monster Park Expert] (max level: 1)
- Collector’s Trust: Commanders II: [Content Skill] Increase the selling price of your Powerful Strength Crystals from Normal Will/Hard Will/Normal Lucid/Hard Lucid/Normal Demian/Hard Demian/Normal Suu/Hard Suu by 50%. [required skill: level 1 Boss Monster Expert: Commanders II] (max level: 1)
 Alicia’s Trust: [Content Skill] Acquire 1 additional Alicia’s Ring Box after clearing the SEED. [required skill: level 1 The SEED Expert] (max level: 1)
Alliance Supply Shop
The Alliance Supply Shop’s Legend tab has been activated. The items that can be purchased are as follows.
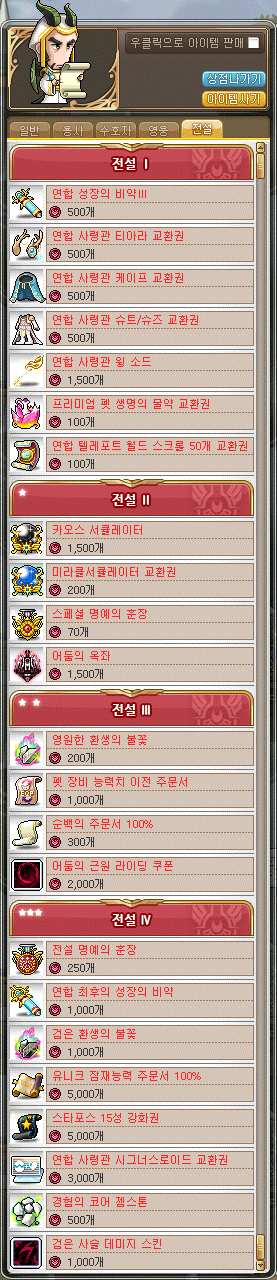
Legend I
- Alliance Growth Potion III (potion that can only be used by characters level 200 or higher, gives 1 level up if used between level 200~229 and a significant amount of experience if used above level 229) (500 medals) [limit of 1 per world]
- Alliance Commander Tiara Voucher (500 medals) [limit of 1]
- Alliance Commander Cape Voucher (500 medals) [limit of 1]
- Alliance Commander Suit/Shoes Voucher (500 medals) [limit of 1]
- Alliance Commander Wing Sword Voucher (1,500 medals) [limit of 1]
- Premium Pet Water of Life Voucher (100 medals) [limit of 3 per world]
- 50 Alliance Teleport World Scrolls Voucher (100 medals) [limit of 3 per world]
Legend II
- Chaos Circulator (can be used if your Ability is Unique or higher, keeps your Ability’s current rank and lines but resets the numbers) (1,500 medals) [limit of 3]
- Miracle Circulator Voucher (200 medals) [limit of 5]
- Special Medal of Honor (70 medals) [limit of 20]
- Throne of Darkness Chair (1,500 medals) [limit of 1]
Legend III
- Eternal Rebirth Flame (200 medals) [limit of 10]
- Pet Equipment Stat Transfer Scroll (can be used to move a scrolled Pet Equipment’s stats and remaining upgrade slots to another Pet Equipment, the original equipment will disappear) (1,000 medals) [limit of 3]
- 100% Clean Slate Scroll (300 medals) [limit of 5 per world]
- Root of Darkness Riding Coupon (2,000 medals) [limit of 1]
Legend IV
- Legend Medal of Honor (gives 50,000 Honor) (250 medals) [limit of 1 per world]
- Alliance Final Growth Potion (potion that can only be used by characters level 200 or higher, gives 1 level up if used between level 200~239 and a significant amount of experience if used above level 239) (1,000 medals) [limit of 1 per world]
- Black Rebirth Flame (Flame that allows you to choose between keeping the new additional options or keeping the old ones) (1,000 medals) [limit of 5 per world]
- 100% Unique Potential Scroll (5,000 medals) [limit of 1 per world]
- 15 Star Force Enhancement Scroll (5,000 medals) [limit of 1 per world]
- Alliance Commander Cygnusroid Voucher (3,000 medals) [limit of 1]
- Experience’s Core Gemstone (gives a special Condensed Experience Core that can be used as experience equivalent to 3 Cores for another Core) (500 medals) [limit of 1]
- Black Chain Damage Skin (1,000 medals) [limit of 1]
Missions
")
")
")
")


The Defense Mission: Flame Bird’s Help has been added.
- By talking the Helena, you can learn the Flame Bird’s Summon skill.
- You can right click the Flame Bird’s Summon skill while in a map with monsters around your level range to summon it.
- While the Flame Bird is summoned, defeated monsters will drop Flame Bird’s Desire.
- When you acquire the Flame Bird’s Desire, you will gain 30 Desire and the Flame Bird’s aura and experience will be increased.
- When the Flame Bird’s aura reaches a certain stage, you can use the skill key again to ride the Flame Bird and defeat monsters. However, you cannot use certain skills while riding on it.
- When the Flame Bird’s experience reaches certain amounts, it will grow up to 4 stages. Its flight time and damage will be increased for each stage.
- If you have already collected your daily limit of Desire, you can no longer summon the Flame Bird.
- The Flame Bird cannot be summoned in certain areas, including Tenebris.

The Defense Mission: Twilight’s War has been added.
- Twilight’s War is a mission where 2~4 characters join forces to defeat enemies using cannons and protect the castle walls.
- While in a party, the party leader can speak to Mike to enter.
- When the mission begins, the party will share a base score of 1200 points (400 points per wall with 3 walls).
- If you defeat a monster, you will receive a certain number of points that is shared with all party members.
- The mission will end when the last boss monster, Giant Omen, is defeated or when all three walls are destroyed.
- If you leave while there are still walls up, you will not receive any points.
- At the end of the mission, you will get Desire based on the number of points you earned.
- Based on your total accumulated points, your cannons’ rank will increase over 4 stages. Higher rank cannons will have higher damage and explosion range.
- You can acquire up to 10,000 points per day in Twilight’s War.
- You can re-enter Twilight’s War after 5 minutes.
- If you have already collected your daily limit of Desire, you will no longer gain Desire but you can increase your total cumulative points.

The Change in Maple World: Strike has begun.
- While hunting Elite Monsters, fallen warriors will appear and attack characters.
- 30 fallen warriors will be summoned at the same time and they give a high amount of experience as well as a certain amount of Desire.
- If you cannot defeat all of them within the time limit, the remaining fallen warriors will disappear.
- If you have already collected your daily limit of Desire, defeated fallen warriors will not drop Desire.

The Change in Maple World: Desire Harrier has begun.
- When you use a Rune or Bait, the Desire Harrier will appear.
- The Desire Harrier will fly around your character and every time it is hit (up to a certain amount), it will drop Desire.
- If you cannot defeat the Desire Harrier within the time limit, it will disappear.
- If you have already collected your daily limit of Desire, it will no longer appear.
Labyrinth of Suffering


Tenebris’ 2nd area, the Labyrinth of Suffering, has been added. You can access it through the portal in the Maple Alliance Outpost. It is only available for users that are level 200 or higher and have completed the 5th job advancement.
Based on the world’s progress of the Journey of Destiny, Tenebris’ story will proceed gradually. As you can see above, the area’s maps will be revealed over time, so you’ll have to work together and collect enough Desire to unlock everything. However, you cannot enter regions from previous stages.
In the Labyrinth of Suffering area, there are both Labyrinth Maps and Dungeons.
In Labyrinth Maps, unlike regular maps, there will be no Runes, flowers/veins, or Burning Fields and no items will be dropped. However, you will be able to gain a lot of additional experience from various exclusive gimmicks.
After the Labyrinth of Suffering story quests are completed past a certain stage, the area will change into a Dungeon with constantly changing paths. Every time you enter, the maps will change.
You can enter the dungeon in a party of 1 or more people. When you enter, you will each have 3 Soul Stones. If you die inside the labyrinth, one Soul Stone will be consumed and you will be revived. If you use up all of your Soul Stones, you will eventually fail to explore the dungeon.
When you enter the dungeon, you and your party members will be scattered among unknown locations. You must wander through the labyrinth and complete various missions. To move to the next area, you must clear your missions. If you happen to encounter a party member in the labyrinth, you can complete your missions together.
")
")
")
To escape the dungeon, you must find the place where the Labyrinth’s Nucleus is located. At the end of the Labyrinth, if you sacrifice your party’s Soul Stones to the Candle Altar and reveal all of the candles, you will be able to destroy the Nucleus.
Elite Monsters and Elite Bosses that appear in the Tenebris area will have stats proportional to the map’s monsters’ stats, based on the average level of the characters in the map.
You can no longer enter Moonbridge.
Labyrinth of Suffering Missions
The Expedition Mission: Labyrinth of Suffering has been added.
- Mission Requirements: Complete the “[Black Mage] Gather at the Outpost” and the 5th job advancement.
- Mission Beginning: Accept the “[Alliance Mission] Expedition Mission – Into the Labyrinth” quest from Helena.
- Help the Tenebris expedition to escape dangerous situations inside the Labyrinth of Suffering.
- When you begin the quest, you’ll also receive 3 fixed missions.
- The Labyrinth of Suffering expedition and the 3 additional missions can be completed once per day. The limit will reset every day at midnight.
- When you complete an additional mission, you’ll receive 10,000 Desire.
- If you complete all 3 additional missions, you’ll complete the Labyrinth of Suffering expedition and receive the Alliance’s Loot. This will give 6m mesos, 2 Core Gemstones, and 1 Rare Reward Box.
- The dangerous situations can vary based on the Journey of Destiny. If they change, you can talk to Helena to replace the missions with new ones.
The Expedition Mission: Moonbridge can no longer be completed.


New illustrations.


New NPC illustrations.
TBA
New maps.
Depth of Pain
Eternal Swamp
Heart of Suffering
Secret Labyrinth
New BGMs.

")

")

")

")

")

")

")

")

")

")

")

")

")


New monsters have been added.
- Tangled Fragment
- Obeying Fragment
- Failure of Darkness
- Creature of Darkness
- Silent Warrior
- Silent Scout
- Silent Wanderer
- Wings of Despair
- Blade of Despair
- Silent Observer
- Silent Assassin
- Missing Despair
- Bound Despair
- Flying Fear
- Flying Despair
- Flying Pain


The following medals have been added.
- The One Who Knows the Depths of the Labyrinth (15 all stats, 1000 HP/MP, 5 attack/magic attack)
- The Light from the Eternal Swamp (3 attack/magic attack)
True Hilla

Commander True Hilla, newly reborn with the Black Mage’s power, appears inside the Labyrinth of Suffering. You can meet her after completing the deepest dungeon in the Labyrinth of Suffering.
")
")
")
")
")
")
")
")
")
")

")
")
")
")
Here’s all of her skills! I don’t know what her mechanics are like yet or what her stats are.
One more cool one!
")
")
")
")
")
")
")
")
")
")
")
")
True Hilla, like a true shamaness, is able to summon the departed spirits of two past Commanders, Suu and Demian!
5th Job Advancement
When you advance to 5th job, you will now receive all job-only Skill Cores.
Existing 5th job characters can acquire the new 5th job Skill Core through the quest “[Black Mage] New Power to Fight the Black Mage”.
3rd V Skill Changes
Paladin
 Grand Cross: you can now ignore Stuns while holding this skill key down, HP consumption, maximum keydown time, attack range, damage, and cooldown have been adjusted
- Level 25: Consumes 5000 HP, then 2.5% → 1.5% max HP per second. While holding the key down, the cross will deal 600% damage 6 times continuously on up to 12 enemies. After continuing for a certain period of time, the cross will become bigger, its attack speed will be increased, and it will deal 1100% → 1200% damage. Maximum keydown time is 12 → 10 seconds. While holding the key down, damage from enemies (including % HP attacks) will be decreased by 42%. Cooldown: 240 → 180 seconds.
Dark Knight
 Pierce Cyclone: maximum keydown time has been adjusted
- Level 25: Consumes 100 MP. For up to 8 → 9 seconds, deal 800% damage 12 times on up to 12 enemies in front of you continuously. When an enemy is hit, heal 1% maximum HP. When the key is released, perform a final attack that deals 2400% damage 12 times on up to 12 enemies. When an enemy is hit by the final attack, heal 10% maximum HP. All of the attacks have an additional 30% defense ignore. Cooldown: 180 seconds.
Archmage (F/P)
 Fury of Ifrit: cooldown has been adjusted
- Level 25: Consumes 1000 MP. For 3 seconds, Ifrit deals 400% damage 6 times on up to 12 enemies continuously. For every stack of Fervent Drain, the duration will be increased by 0.6 seconds. Cooldown: 90 → 75 seconds.
Archmage (I/L)
 Spirit of Snow: maximum number of enemies hit has been adjusted
- Level 25: Consumes 1000 MP. For 30 seconds, the Spirit of Snow will attack dealing 600% damage 9 times on up to 6 → 8 enemies and inflicting 1 stack of Freeze. When hitting only 1 enemy, the Spirit of Snow will deal 1000% damage 9 times and inflict 3 stacks of Freeze. Cooldown: 180 → 120 seconds.
Bishop
 Peacemaker: number of ‘touches’ has been adjusted, you can now instantly end the skill even while in Vengeance of Angels
- Level 25: Consumes 350 MP. Deals 600% damage 4 times on up to 6 enemies continuously. The objet will heal the nearest party member (including yourself) for 40% of the Bishop’s maximum HP. It can attack and heal up to 10 → 12 times (combined limit). Cooldown: 10 seconds.
- Divine Light: Deals 800% damage 8 times on up to 10 enemies. The Bishop and any party members in the light will have their damage increased by 10% + 1% per remaining objet limit for 8 seconds.
- Level 25: Consumes 350 MP. Deals 600% damage 4 times on up to 6 enemies continuously. The objet will heal the nearest party member (including yourself) for 40% of the Bishop’s maximum HP. It can attack and heal up to 10 → 12 times (combined limit). Cooldown: 10 seconds.
Bowmaster
 Quiver Full Burst: number of fired Flame Arrows has been adjusted
- Level 25: Consumes 1000 MP. For 30 seconds, use all of your arrowheads at the same time, as well as a special flame arrowhead. Flame Arrowhead: Shoot 5 → 6 Flame Arrows at the same time, dealing 1100% damage 3 times on up to 6 enemies. Cooldown: 180 seconds.
Night Lord
 Dark Lord’s Secret Scroll: number of additional stars regardless of number of enemies has been adjusted
- Level 25: Consumes 1000 MP. For 8 seconds, summon a scroll that continuously fires 5 stars per nearby enemy that deal 700% damage on up to 7 enemies. Regardless of the number of enemies, an additional 5 → 7 stars will be fired. After the duration ends, the scroll will explode, dealing an additional 1800% damage 10 times on up to 12 enemies. Cooldown: 60 seconds.
Shadower
 Sonic Blow: now ignores a certain amount of defense and has increased critical rate, fixed an error where you could be knocked back by enemy attacks, fixed an error where Pickpocket’s coins would not be dropped
- Level 25: Consumes 1000 MP. For 3 seconds, deal 700% damage 7 times on up to 8 enemies continuously with an additional 100% critical rate and 100% defense ignore. Cooldown: 90 seconds. For every Killing Point consumed, the cooldown will be decreased by 0.5 seconds.
Dual Blade
 Blade Tornado: tornado now ignores a certain amount of defense
- Level 25: Consumes 750 MP. Deals 1200% damage 7 times on up to 10 enemies. The tornado deals 600% damage 6 times on up to 10 enemies continuously. All attacks have an additional 100% defense ignore. Cooldown: 15 seconds.
Cannon Shooter
 Special Monkey Escort: duration has been adjusted, fixed an error where the damage would be decreased when using Buckshot, fixed an error where the Buff Freezer applied to this skill
- Level 25: Consumes 1000 MP. For 30 → 42 seconds, summon the Champion Monkey Squad, three monkeys who use Monkey Cannon and Monkey Bomb. Cooldown: 120 seconds.
- Monkey Cannon: Deals 600% damage 3 times on up to 3 enemies, reactivation cooldown: 1.5 seconds
- Monkey Bomb: Deals 900% damage 6 times on up to 12 enemies, reactivation cooldown: 5 seconds.
- Level 25: Consumes 1000 MP. For 30 → 42 seconds, summon the Champion Monkey Squad, three monkeys who use Monkey Cannon and Monkey Bomb. Cooldown: 120 seconds.
Mikhail
 Sword of Soul Light: attack boost and Soul Light Slash’s number of hits have been adjusted
- Level 25: Consumes 1200 MP. For 30 seconds, equip the Sword of Light, increasing your attack by 30% → 27%, critical rate by 100%, and defense ignore by 100%. Cooldown: 180 seconds.
- Soul Light Slash: Consumes 100 MP. Deals 1300% damage 6 → 7 times on up to 8 enemies.
- Level 25: Consumes 1200 MP. For 30 seconds, equip the Sword of Light, increasing your attack by 30% → 27%, critical rate by 100%, and defense ignore by 100%. Cooldown: 180 seconds.
Soul Master
 Soul Eclipse: fixed an error where this skill could not be used in the air at certain attack speeds
Flame Wizard
 Infinity Flame Circle: fixed an error where multiple Phoenix Feathers were consumed or prepared at the same time, fixed an error where the skill continued even while affected by status effects, fixed an error where this skill could not be used while jumping
Wind Breaker
 Wind Wall: maximum number of Element and twister’s number of hits has been adjusted, Element is no longer consumed when the twister attacks
- Level 25: Consumes 1000 MP. For 45 seconds, create a wind wall with 170 → 275 Element. When an enemy hits you (including % HP attacks), 1 Element will be consumed per 1% of your maximum HP taken as damage and the damage will be nullified. When attacking, every 2 seconds, fire 3 twisters, dealing 1100% damage 3 → 4 times. If multiple twisters hit 1 enemy, their final damage will be decreased by 50%. Cooldown: 90 seconds.
Night Walker
 Shadow Bite: final damage buff duration has been adjusted
- Level 25: Consumes 1500 MP. Deals 800% damage 14 times on up to 15 enemies, deals 1200% damage 14 times on boss monsters. If you can summon Shadow Bats, Shadow Bats will be created at enemies’ locations after they are hit. For 15 → 17 seconds, gain 1% final damage per monster killed by Shadow Bite. If Shadow Bite hits a boss monster, gain 14% final damage. Shadow Bite’s final damage boost will apply up to 15%. Cooldown: 20 seconds.
Striker
 Lightning God Spear Strike: number of hits and cooldown have been adjusted
- Level 25: Consumes 500 MP. After a linked attack hits an enemy 8 times, the next attack will summon the Lightning God’s Spear. When the spear is summoned, it deals 300% damage 6 times on up to 8 enemies. After a short time, it deals 400% damage 6 → 7 times on up to 8 enemies, activating 4 times. Reactivation cooldown: 8 → 7 seconds.
Aran
 Fenrir Crash: number of hits, damage, and cast delay have been adjusted, fixed an error where Beyonder – Bonus Attack did not apply to this skill
- Level 25: Consumes 200 MP. Deals 750% → 700% damage 5 → 7 times on up to 10 enemies. For every 1 less enemy you hit, the skill’s damage will be increased by 6%, stacking multiplicatively. The attack has an additional 100% critical rate and 50% defense ignore. When used during Adrenaline Boost, create an iceberg that deals 750% damage 5 → 6 times on up to 10 enemies. Can be used after Beyonder’s 3rd attack.
Evan
 Zodiac Ray: duration has been adjusted, fixed an error where the damage did not apply normally
- Level 25: Consumes 1000 MP. Install a magic circle for 15 → 16 seconds. When you can charge it with 25 Magic, it will begin and deal 800% damage 6 times on up to 12 enemies continuously for the skill’s remaining duration with an additional 100% defense ignore. When an elemental skill hits an enemy, charge 3 Magic (limit of once per skill). When a non-elemental skill hits an enemy, charge 1 magic (no limit). Cooldown: 180 seconds.
Luminous
 Baptism of Light and Darkness: damage and cooldown have been adjusted
- Level 25: Consumes 2000 MP. Summon the swords of light and darkness, dealing 600% → 750% damage 7 times, activating 13 times in a row. All of the attacks have an additional 100% critical rate and 100% defense ignore. Cooldown: 60 → 45 seconds. When Absolute Kill hits an enemy, you’ll receive 1 ceremonial sword. If you collect 12 swords, Baptism of Light and Darkness’ cooldown will be instantly reset.
Mercedes
 Irkalla’s Breath: damage has been adjusted
- Level 25: Consumes 150 MP. For up to 8.5 seconds, deal 700% → 750% damage 6 times on up to 10 enemies in front of you continuously. You can use it backwards by pressing the arrow keys twice to change directions. Cooldown: 120 seconds.
Phantom
 Mark of Phantom: cooldown and Dark Sight duration after being used have been adjusted
- Level 25: Consumes 1000 MP and all of the Master Thief’s Marks. Move behind Phantom’s target or the furthest enemy in range if there is none, then attack. Phantom’s target is given first priority. When the movement begins, enter Dark Sight for 1 → 3 seconds to avoid running into the enemy. Deal 1200% damage 2 times, activating 7 times, then perform a final attack, dealing 2400% damage 10 times. All attacks hit up to 10 enemies and have an additional 100% critical rate.
Enemies hit by skills using the Cane will be inflicted with a debuff for 30 seconds, stacking up to 7 times. The enemy with the debuff will be Phantom’s target. Only one enemy can be targeted, and the enemy with the highest maximum HP in range will be given priority. When an enemy is hit by skills using the Cane, acquire 1 Master Thief’s Mark. To use Mark of Phantom, you need 7 Marks. Ultimate Drive requires 5x as many hits on enemies as other skills to acquire a Master Thief’s Mark. Cooldown: 30 → 25 seconds.
- Level 25: Consumes 1000 MP and all of the Master Thief’s Marks. Move behind Phantom’s target or the furthest enemy in range if there is none, then attack. Phantom’s target is given first priority. When the movement begins, enter Dark Sight for 1 → 3 seconds to avoid running into the enemy. Deal 1200% damage 2 times, activating 7 times, then perform a final attack, dealing 2400% damage 10 times. All attacks hit up to 10 enemies and have an additional 100% critical rate.
Eunwol
 True Spirit Claw: now ignores a certain amount of defense, attack range, cooldown, and cast delay have been adjusted
- Level 25: Consumes 80 MP. Deals 750% → 1000% damage 8 times on up to 10 enemies with an additional 50% defense ignore. Activates when using Spirit Claw. Re-enhancement cooldown: 7 → 6 seconds.
Demon Slayer
 Orthrus: damage has been adjusted
- Level 25: Consumes 60 Force and 10% maximum HP. Summon the twin gods for 40 seconds. All of their attacks have an additional 100% critical rate and 50% defense ignore. Cooldown: 120 seconds.
- Nemea: Every 3 seconds, deals 600% → 800% damage 12 times on up to 10 enemies.
- Geryon: Every 5 seconds, deals 1200% → 1600% damage 10 times on up to 10 enemies.
- Level 25: Consumes 60 Force and 10% maximum HP. Summon the twin gods for 40 seconds. All of their attacks have an additional 100% critical rate and 50% defense ignore. Cooldown: 120 seconds.
Demon Avenger
 Dimension Sword: damage has been adjusted
- Level 25: Consumes 20% HP. For 40 seconds, summon intangible swords that deal 1600% → 1700% damage 8 times on up to 8 enemies every 3 seconds. While they are summoned, you can use the skill again to cause the swords to rotate quickly around you, dealing 610% → 600% damage 6 times on up to 8 enemies continuously for 1/5 of Dimension Sword’s remaining duration, after which the swords will immediately disappear. All of Dimension Sword’s attacks have an an additional 100% defense ignore. Cooldown: 120 seconds.
Blaster
 Burning Breaker: damage, number of hits, and cooldown have been adjusted
- Level 25: Consumes 1000 MP and 1 Bullet. You can prepare for up to 5 seconds, during which you can use Revolving Cannon and consume up to 5 additional Bullets. After the key is released, you will rush forward and release an explosion based on the number of used Bullets. While preparing, rushing forward, and releasing the explosion, you will be invincible. During the skill cast action, your Combination Training stacks will be maintained. All of the attacks have an additional 100% critical rate and 100% defense ignore. Cooldown: 120 → 100 seconds.
- Rush: deals 3000% damage 15 times on up to 12 enemies.
- Explosion: deals 3000% → 2400% damage 12 → 15 times on up to 12 enemies.
- Level 25: Consumes 1000 MP and 1 Bullet. You can prepare for up to 5 seconds, during which you can use Revolving Cannon and consume up to 5 additional Bullets. After the key is released, you will rush forward and release an explosion based on the number of used Bullets. While preparing, rushing forward, and releasing the explosion, you will be invincible. During the skill cast action, your Combination Training stacks will be maintained. All of the attacks have an additional 100% critical rate and 100% defense ignore. Cooldown: 120 → 100 seconds.
Battle Mage
 Grim Reaper: damage and cooldown have been adjusted
- Level 25: Consumes 1000 MP. Summon the Grim Reaper for 30 seconds. Every 4 seconds, it will deal 1400% → 1500% damage 12 times on up to 10 enemies. If you move a certain range away from the Grim Reaper, it will move to your location. The Grim Reaper’s duration will be increased by 0.2 seconds per enemy killed or by 2 seconds per hit on a boss monster. Cooldown: 150 → 120 seconds.
Wild Hunter
 Wild Grenade: number of hits and attack range have been adjusted
- Level 25: Consumes 500 MP. Explosion deals 1200% damage 5 → 6 times on up to 8 enemies. If used while using Wild Vulcan, there will be no cast action. Every 4.5 seconds, prepare 1 grenade, you can hold up to 8 at a time. Cooldown: 0.5 seconds.
Xenon
 Hologram Gravity: Fusion: party HP boost has been changed to a damage boost, damage, number of Aegis System missiles, and cooldown have been adjusted
- Level 25: Consumes 1000 MP. For 30 seconds, create a hologram field. When the ball touches the edge of the field, it deals 2000% → 2500% damage on up to 10 enemies. When the ball touches an enemy, it deals the same damage. Party members inside the hologram field will have their maximum HP increased by 10% → damage increased by 17% and if they avoid an attack, charge 1 Surplus Energy. If Xenon is inside the hologram field, Aegis System will fire an additional 4 → 7 missiles when activated. Cooldown: 120 → 100 seconds.
Kaiser
 Draco Slasher: now ignores a certain amount of defense and has increased critical rate, damage, number of enemies hit, and cooldown have been adjusted
- Level 25: Consumes 60 MP. Deals 450% → 625% damage 10 times on up to 3 → 8 enemies. After attacking, fires the dragon’s aura, dealing 700% → 625% damage 6 times on up to 8 enemies with an additional 100% critical rate and 50% defense ignore. Final Figuration: all attacks’ number of hits are increased by 2x. Activates when using Giga Slasher. Re-enhancement cooldown: 7 → 6 seconds.
Angelic Buster
 Mascot Familiar: cooldown has been adjusted, fixed an error where the damage did not apply normally
- Level 25: Summon Eskada as a familiar for 35 seconds. When you successfully Recharge while it is summoned, Eskada will use either Twinkle Star or Magical Balloon, which deal 1200% damage 3 times on up to 6 enemies. If Eskada is already taking an action, it will not use another skill. When Twinkle Star or Magical Balloon hits an enemy, you will acquire 1 Magical Bubble, and you can hold up to 8 at a time. When you use the skill one more time, Eskada will use Shiny Bubble Breath, dealing 500% damage 7 times on up to 10 enemies continuously for 3 seconds. When it is used, all of your Magical Bubbles will be consumed and the attack’s duration will be increased by 0.4 seconds per bubble. You can only use this once per summon, and even if the skill’s duration ends while this attack is going on, it will finish completely before disappearing. Cooldown: 180 → 150 seconds.
Zero

 Shadow Flash: cooldown has been adjusted
- Level 25: Consumes 10 Time Force. Create a sacred area at your current location for as long as the cooldown time, attacking up to 8 enemies continuously. Alpha: 1000% damage 6 times, Beta: 1200% damage 5 times. Cooldown: 60 → 40 seconds.
- Skill Reuse: Consumes 25 Time Force. Instantly return to your sacred area, destroying it and attacking up to 15 enemies. Alpha: activate 3 sword strikes dealing 800% damage 15 times, Beta: activate 2 attacks dealing 1500% damage 12 times.
- Level 25: Consumes 10 Time Force. Create a sacred area at your current location for as long as the cooldown time, attacking up to 8 enemies continuously. Alpha: 1000% damage 6 times, Beta: 1200% damage 5 times. Cooldown: 60 → 40 seconds.
Kinesis
 Ultimate – Psychic Bullet: now restores PP when Psychic Bullet hits an enemy, damage and number of Micro Black Hole activations have been adjusted
- Level 25: Consumes 3 Psychic Points. The bullet deals 1500% → 1600% damage 6 times on up to 8 enemies, as well as the enemy being held. If the skill hits an enemy, charge 1 Psychic Point. Micro Black Hole: The black hole deals 600% → 700% damage 3 times on up to 8 enemies, activating 5 → 4 times. If the skill hits an enemy, charge 1 Psychic Point.
Ark
 Escaped Nightmare: number of hits and damage in Lef form have been adjusted
- Level 25: When you use Endless Nightmare, activate the Spectre’s aura, dealing 900% → 1000% damage 8 → 9 times on up to 10 enemies. Reactivation cooldown: 10 seconds. When any Charge Drive skills hit an enemy (except Plain Charge Drive), the reactivation cooldown will be decreased by 1 second (applies only 1 time per skill).
 Escaped Ominous Dream: number of hits has been adjusted
- Level 25: When you use Endless Ominous Dream, activate the Spectre’s aura, dealing 1200% damage 8 → 9 times on up to 12 enemies. Reactivation cooldown: 10 seconds. When Unfading Scar/Unstoppable Instinct/Unsatiated Hunger/Crawling Fear/Uncontrollable Chaos hit an enemy, the reactivation cooldown will be decreased by 1 second (applies only 1 time per skill).
Skill Related
 With Illium’s Crystal Control, you can now use it with the up arrow key to instantly move the Crystal to your location.
Game Related

The World Connection Queue feature has been added.
- If there are many people connecting to a world at the same time, you will be entered into a queue.
- Based on the order of entry, you will automatically be given a channel and be moved to the Character Select screen.
- If you cancel the queue, your waiting rank will be reset.
The Character Information window’s Wishlist feature will no longer be supported.
The Tenebris Expedition Ring can now be sold to NPC stores.

Max, can you green the fixed stuff, cause fixing/removing delays is a bonus. I feel like it would be a good idea
btw First
first
Naw I beat you look above
Sorry, I also forgot to ask if you or anybody else could give me a link for the fixes for Fenrir Crash for Aran, with the description true from THIS Kmst patch.
So, can you clarify what you mean by being unable to re-enter Moonbridge?
Does this mean that once you go through Moonbridge once, you can’t go through it again? Or does it mean once you enter Labyrinth, you can’t go back to Moonbridge?
Once the Labyrinth of Suffering is unlocked, you aren’t even given the option of going to Moonbridge. Similarly, once one section of a region (e.g Moonbridge is separated into 3 sections) is passed, you can only enter the newly unlocked section and not any previous ones.
Eh, that’s better than what people were implying. Some were claiming it was like an event area where it was shut down to everyone regardless of whether or not they had completed Moonbridge. What you’re saying sounds like it’s just a more linear form of story exploration.
“Some were claiming it was like an event area where it was shut down to everyone regardless of whether or not they had completed Moonbridge”
Sorry I might not have been clear enough, this is exactly what happens. Everyone can only do one section at a time. The way it works is there are 15-20 minute ‘story’ portions that unlock when the new sections are unlocked and then after that you just have daily missions. But let’s say for example, you didn’t play at all when Moonbridge was out and now Labyrinth of Suffering is unlocked. The only thing you would be able to do is all of those ‘story’ portions all in a row until you get to the part everyone else is on. You wouldn’t be able to explore Moonbridge or anything.
Oh. That’s still better than not being able to do it at all, though.
So basically, Tenebris is an event area. Well this sucks.
I feel like that too, seens more like a massive event with all the “after this you can’t do this” everything is timed, FeelsBadMan
Yep but I’m like 99% sure they’ll change it into permanent content (by removing the Frozen Link mechanics and Desire stuff) after the summer. The reason why they designed it like this is to allow everyone regardless of level to be able to ‘participate’ in defeating the Black Mage.
I hope you’re correct Max. But I wonder how level 200s will participate in True Hilla if she’s level 250. Unless…
I don’t have KMST files, could you check if True Hilla has the nonLevelCheckACC/EVA variables? If so, then level 200s can participate after all!
Don’t see them
Could you also translate what damage skins are in the labyrinth dmg skin box please? Much appreciated.
Oh didn’t realize they added it, last patch it didn’t say anything!
– Chalk Damage Skin
– Keyboard Warrior Damage Skin
– Noise Damage Skin
– Graffiti Damage Skin
– Full Moon Damage Skin
– Absolabs Damage Skin
– Black Rose Damage Skin
– Space Damage Skin
– Labyrinth’s Flame Damage Skin
– Labyrinth’s Flame Damage Skin (Unit)
so if Kinesis just uses the skill, it charges 1 PP automatically? Holy shit…
Yes, The old one almost never ran out of PP already.
This will make Kinesis new Marksman with no cooldown (and more mobile).
Hmm… I guess Xenon’s skill is good now… maybe…
OP as heck
Well, it’s a lot better than I thought it would be.
It does more than double level 50 boost node hologram with previous buff patch already.
Mention about my 4 main.
Kinesis will be #1 farming class hand down.
I/L back to top 3 farming class again.
Xenon finally have something useful for party aside bind.
Wind Archer survive improved by 10000000x.
Such a great patch.
how is shade now
Isnt the Aran skill 700%? Im almost sure it is
yea its 700%
Oops lol I have no idea how I saw the damage change, will fix, ty.
Heya Max!
Thank you so much for writing the patch update ❤️ I still have a hard time digesting this whole Tenebris content, what players gain from defeating True Hilla?
No one knows yet since the patch notes didn’t say and she’s not unlocked in KMST yet.
Another question, don’t know if you saw anything: does the new Aran skill add to the combo counter?
I believe they fixed that in the last KMST patch!
How does progression for the hero tier work? We have the 4 bubbles for guardian and it’s pretty easy, every bubble is a rank, but there were only 3 on tespia for hero.
Nice additional boost to shadower by giving 100% def ignore and crit rate… but since they nerfed eviscerate so much, they really need to boost the duration n damage of sonic blast! 3 seconds is so so less! n 700% only!
hey max, why is the masked mans npc illustration there? is he gonne make a reappearance in the labyrinth of suffering? thanks!
Apparently :^)
Would it be possible for you to upload the extraction of the True Hilla floating gif loop from the server select screen and the boss entry? Would really appreciate it. Thanks Max!
Hey Max About Chaos Circulator … i got question the ranking and line the line remain the same? so what does it mean reset the number? if i had a like + 1 attack speed 10 attack and 20 buff duration? what would happen if i use Chaos Circulator would they all remain the same line? and attack speed wouldnt change right? only other 2 line would change to -/+ attack and buff duration right?
I would assume so, just as Chaos Scrolls work. Att Speed wouldn’t change, but for example boss dmg could go from 19-20%
So basically gender swap Kayn?
That version of Hilla looks like she is going to be a true nightmare….Gotta hand it to them…No matter how op we get, There are bosses that can still make us work for it.